Onfido Smart Capture iOS SDK


![]()
![]()
Overview
The Onfido Smart Capture SDKs provide a set of screens and functionalities that enable applications to implement user identity verification flows. Each SDK contains:
- Carefully designed UX to guide your customers through the different photo or video capture processes
- Modular design to help you seamlessly integrate the different photo or video capture processes into your application's flow
- Advanced image quality detection technology to ensure the quality of the captured images meets the requirement of the Onfido identity verification process, guaranteeing the best success rate
- Direct image upload to the Onfido service, to simplify integration
- A suite of advanced fraud detection signals to protect against malicious users
All Onfido Smart Capture SDKs are orchestrated using Onfido Studio workflows, with only minor customization differences between the available platforms.
Environments and testing with the SDK
Two environments exist to support the Onfido SDK integrations:
- 'sandbox' - to be used for testing with sample documents
- 'live' - to be used only with real documents and in production apps
The environment being used is determined by the API token that is used to generate the necessary SDK token.
Going Live
Once you are satisfied with your integration and are ready to go live, please contact Onfido's Customer Support to obtain a live API token. You will have to replace the sandbox token in your code with the live token.
Check that you have entered correct billing details inside your Onfido Dashboard, before going live.
Adding the SDK dependency
The iOS SDK supports:
- iOS 13+
- Xcode 15+ (because of Swift minimum version)
- The SDK supports the following presentation styles:
- Only full screen style for iPhones
- Full screen and form sheet styles for iPads
Note: The iOS SDK requires CoreNFC to run (regardless of whether you use NFC or not). Since Xcode 12, there is a bug where libnfshared.dylib is missing from simulators. Refer to Stack Overflow for a solution to this problem.
Note: In the event that you disable the NFC feature, Apple might ask you to provide a video to demonstrate NFC usage because NFC-related code is part of the SDK binary, regardless of your configuration. You can find a video demonstrating our NFC feature that you can submit to Apple here.
App permissions
The SDK makes use of a user's device camera (for document and face capture) and microphone (for video and motion capture). You're required to have the following keys in your application's Info.plist file:
NSCameraUsageDescriptionNSMicrophoneUsageDescription
1<key>NSCameraUsageDescription</key>2<string>Required for document and face capture</string>3<key>NSMicrophoneUsageDescription</key>4<string>Required for video capture</string>
Note: All keys will be required for app submission.
App permissions for NFC and Proof of Address
If your integration makes use of the NFC or Proof of Address (PoA) modules, the following keys must also be included in your application's Info.plist file:
NFCReaderUsageDescriptionNSPhotoLibraryAddUsageDescription
NFC
1<key>NFCReaderUsageDescription</key>2<string>Required to read ePassports</string>
Proof of Address
1<key>NSPhotoLibraryAddUsageDescription</key>2<string>Required to read images from the photo library, when uploading documents</string>
Adding the dependency
Using Swift Package Manager
The SDK is available with Swift Package Manager, and you can include it in your project by adding the following package repository URL:
Swift
1dependencies: [2 .package(url: "https://github.com/onfido/onfido-ios-sdk.git", .branch("master"))3]
Using CocoaPods
The SDK is also available on CocoaPods, and you can include it in your project by adding the following to your Podfile:
1pod 'Onfido'
Run pod install to get the SDK.
Manual installation
The SDK is available in the GitHub Releases tab, where you can download the compressed framework. You can find the latest release here.
- Download the compressed zip file containing
the
Onfido.xcframework - Uncompress the zip file and then move the
Onfido.xcframeworkartefact into your project folder - Open your app's project file in Xcode. Then select your app's target under target list
- Add
Onfido.xcframeworklocated within your project to theEmbedded binariessection in theGeneraltab of your iOS app target
⚠️ Do not add the xcframework as resources to your app target, as only few files are required that xcode will automatically take during build.
Non-Swift apps
If your app is not Swift based, then you must create a new Swift file inside of your project. This file is required to force Xcode to package Swift runtime libraries required for the Onfido iOS SDK to run.
-
Create a Swift file with the following contents:
swift1import Foundation2import AVFoundation3import CoreImage4import UIKit5import Vision67func fixLibSwiftOnoneSupport() {8 // from https://stackoverflow.com/a/54511127/29829939 print("Fixes dyld: Library not loaded: @rpath/libswiftSwiftOnoneSupport.dylib")10} -
Set
Always Embed Swift Standard LibrariestoYesin your project configuration.
Initializing the SDK
⚠️ The following SDK initialization documentation applies to identity verification workflows orchestrated using Onfido Studio. For integrations where the verification steps are manually defined and configured, please refer to the Advanced flow customization section below.
The iOS SDK has multiple initialization and customization options that provide flexibility to your integration, while remaining easy to integrate.
Defining a workflow
Onfido Studio is the platform used to create highly reusable identity verification workflows for use with the Onfido SDKs. For an introduction to working with workflows, please refer to our Getting Started guide, or the Onfido Studio product guide.
SDK sessions are orchestrated by a session-specific workflow_run_id, itself derived from a workflow_id, the unique identifier of a given workflow.
For details on how to generate a workflow_run_id, please refer to the POST /workflow_runs/ endpoint definition in the Onfido API reference.
Note that in the context of the SDK, the
workflow_run_idproperty is referred to asworkflowRunId.
Applicant ID reuse
When defining workflows and creating identity verifications, we highly recommend saving the applicant_id against a specific user for potential reuse. This helps to keep track of users should you wish to run multiple identity verifications on the same individual, or in scenarios where a user returns to and resumes a verification flow.
SDK authentication
The SDK is authenticated using SDK tokens. Onfido Studio generates and exposes SDK tokens in the workflow run payload returned by the API when a workflow run is created.
SDK tokens for Studio can only be used together with the specific workflow run they are generated for, and remain valid for a period of five weeks.
Note: You must never use API tokens in the frontend of your application as malicious users could discover them in your source code. You should only use them on your server.
Build a configuration object
To use the SDK, you need to obtain an instance of the client object, using your generated SDK token and workflow run ID.
Swift
1let workflowConfiguration = WorkflowConfiguration(workflowRunId: "<WORKFLOW_RUN_ID>", sdkToken: "<YOUR_SDK_TOKEN>")
Start the flow
Swift
1let onfidoRun = OnfidoFlow(workflowConfiguration: orchestrationConfig)2customerViewController.present(try onfidoRun.run(), animated: true, completion: nil)3// listen for the result
NFC capture
Recent passports, national identity cards and residence permits contain a chip that can be accessed using Near Field Communication (NFC). The Onfido SDKs provide a set of screens and functionalities to extract this information, verify its authenticity and provide the resulting verification as part of a Document report.
From version 29.1.0 onwards of the Onfido iOS SDK, NFC is enabled by default and offered to end users when both the document and the device support NFC.
For more information on how to configure NFC and the list of supported documents, please refer to the NFC for Document Report guide.
Pre-requisites
-
This feature requires
Near Field Communication Tag Readingcapability in your app target. If you haven't added it before, please follow the steps in Apple's documentation. -
To support NFC PACE documents, you need to edit app entitlements:
- Add a new entry nested under the
Near Field Communication Tag Reader Session Formatskey - Select
Password Authenticated Connection Establishment (PACE)from the dropdown list - Alternatively you can also edit your entitlements, with the following entries:
xml1<key>com.apple.developer.nfc.readersession.formats</key>2<array>3 <string>PACE</string>4 <string>TAG</string>5</array>
- Add a new entry nested under the
-
You're required to have the following key in your application's
Info.plistfile:
1<key>NFCReaderUsageDescription</key>2<string>Required to read ePassports</string>
- You have to include the entries below in your app target's
Info.plistfile to be able to read NFC tags properly.
1<key>com.apple.developer.nfc.readersession.felica.systemcodes</key>2<array>3 <string>12FC</string>4</array>5<key>com.apple.developer.nfc.readersession.iso7816.select-identifiers</key>6<array>7 <string>A0000002471001</string>8 <string>A0000002472001</string>9 <string>00000000000000</string>10 <string>D2760000850101</string>11</array>
Configuring NFC
To configure NFC using Onfido Studio, you can use one of the following options in the workflow builder:
- Off: NFC reading will not be asked to the end-users
- If Possible (
optional): NFC reading will be attempted, if possible - Required: NFC reading will be enforced, not allowing end-users to finish the flow without a successful reading
To configure NFC in code, call the withNFC() function while configuring OnfidoConfig (see the Advanced flow customization section below) using the above options.
⚠️ When NFC is configured as
requiredwith code, unlike with Studio, SDK will not filter out document types that are not NFC capable, for end-user best experience, expose only document types that are NFC capable as listed here, or prefer using Studio
Styling customization
The iOS SDK supports the customization of colors, fonts and strings used in the SDK flow.
UI customization
Appearance and Colors
To customize the look and feel of the SDK, you can pass the required CSS values to the Appearance object, in the root of the WorkflowConfiguration object.
Swift
1let appearance = Appearance()2appearance.primaryColor = <DESIRED_UI_COLOR_HERE>3appearance.primaryTitleColor = <DESIRED_UI_COLOR_HERE>
Objective-C
1ONAppearance *appearance = [[ONAppearance alloc] init];2appearance.primaryColor = <DESIRED_UI_COLOR_HERE>;3appearance.primaryTitleColor = <DESIRED_UI_COLOR_HERE>;
Please refer to the SDK customization documentation for details of the supported UI options that can be set in this property.
Dark theme
The iOS SDK supports dark theme customization. By default, the user's active device theme will be automatically applied to the Onfido SDK. However, you can opt out from dynamic theme switching at run time and instead set a theme statically at the build time as shown below. In this case, the flow will always be displayed in the selected theme regardless of the user's device theme.
interfaceStyle allows you to force light or dark mode via .dark and .light respectively.
By default, it is set to .unspecified, which will follow the system's interface style.
Note: The previous attribute supportDarkMode is now deprecated. Please use interfaceStyle instead.
For example, to set the interface style to .dark, you can use the code below:
Swift
1let appearance = Appearance()2appearance.setUserInterfaceStyle(.dark)
Objective-C
1ONAppearance *appearance = [ONAppearance new];2[appearance setUserInterfaceStyle:UIUserInterfaceStyleDark];
Applying the Appearance object
To apply the appearance you can use the methods below:
Swift
1let configBuilder = OnfidoConfig.builder()2configBuilder.withAppearance(appearance)
Objective-C
1ONFlowConfigBuilder *configBuilder = [ONFlowConfig builder];2[configBuilder withAppearance:appearance];
Co-branding
The Onfido SDK allows for two co-branding options that affect the display of the Onfido logo at the bottom of the Onfido screens.
Text co-branding
-
cobrand {Object}- optionalThe most effective way to add your brand to the footer watermark is by use of the
cobrandproperty underenterpriseFeatures. This property takes atextparameter.
Swift
1let companyName = "MyCompany"2let enterpriseFeatures = EnterpriseFeatures.builder()3 .withCobrandingText(companyName)4 .build()
Objective-C
1NSString *companyName = @"MyCompany";2ONEnterpriseFeaturesBuilder *enterpriseFeatures = [ONEnterpriseFeatures builder];3[enterpriseFeatures withCobrandingText: companyName];4[enterpriseFeatures build];
Please note: Text co-branding must be enabled by Onfido. Please contact your Solutions Engineer or Customer Success Manager to activate the feature.
Logo co-branding
-
logoCobrand {Object}- optionalAs an alternative to
cobrand, you may specify a set of images to be defined in thelogoCobrandproperty underenterpriseFeatures. You must provide the path to an image for use in 'dark' mode and a separate image for 'light' mode. Both images must have a resolution of 144x32.
Swift
1let onfidoEnterpriseFeatures = EnterpriseFeatures.builder()2 .withCobrandingLogo(3 UIImage(named: "imageName_for_lightmode")!,4 cobrandingLogoDarkMode: UIImage(named: "imageName_for_darkmode")!5 )6 .build()
Objective-C
1ONEnterpriseFeaturesBuilder *enterpriseFeatures = [ONEnterpriseFeatures builder];2[enterpriseFeatures withCobrandingLogo:3 [UIImage imageNamed:@"onfido-logo-white"] cobrandingLogoDarkMode:[UIImage imageNamed:@"onfido-logo-grey"]4];5[enterpriseFeatures build];
Please note: Logo co-branding must be enabled by Onfido. Please contact your Solutions Engineer or Customer Success Manager to activate the feature.
Add co-branding to OnfidoConfig
To apply co-branding, add the enterprise features object to OnfidoConfig:
Swift
1let configBuilder = OnfidoConfig.builder()2configBuilder.withEnterpriseFeatures(enterpriseFeatures)
Objective-C
1ONFlowConfigBuilder *configBuilder = [ONFlowConfig builder];2[configBuilder withEnterpriseFeatures: enterpriseFeatures];
Language localization
The Onfido SDK supports and maintains translations for over 40 languages.
The strings used within the SDK can be customized by having a Localizable.strings in your app for the desired language
and by configuring the flow using the withCustomLocalization() method on the configuration builder.
Swift
1- (void)withCustomLocalization {2 [self.configBuilder withCustomLocalization]; // will look for localizable strings in your Localizable.strings file3}
For the list of languages supported by Onfido, please refer to our SDK customization documentation.
Note: If no language is selected, the SDK will detect and use the end user's device language setting. If the device's language is not supported, the SDK will default to English (en_US).
Custom languages
The SDK can also be displayed in a custom language for locales that Onfido does not currently support. You can supply full or partial translations. For any key without a translation, the supported language default will be used.
When adding custom translations, you must add the whole set of keys included in the Localizable_EN.strings file (reference).
You can name the strings file with the translated keys as you desire but the name of the file will have to be provided
to the SDK as a parameter to the withCustomLocalization() method:
withCustomLocalization(andTableName: "MY_CUSTOM_STRINGS_FILE")(Swift)[configBuilder withCustomLocalizationWithTableName:@"MY_CUSTOM_STRINGS_FILE"];(Objective-C)
Additionally you can specify the bundle from which to read the strings file:
withCustomLocalization(andTableName: "MY_CUSTOM_STRINGS_FILE", in: myBundle)(Swift)[configBuilder withCustomLocalizationWithTableName:@"MY_CUSTOM_STRINGS_FILE" in: myBundle];(Objective-C)
Note:
- Any string translation change will result in a MINOR version release. Any custom translations you have should not be impacted by this if they have been implemented according to the guidance above
- You are responsible for ensuring the correct layout of any custom translations
To request a new language translation, or offer feedback or suggestions on the translations provided, you can get in touch with Onfido's Customer Support
Completing a session
Handling callbacks
When the Onfido SDK session concludes, a range of callback functions may be triggered.
For advanced callbacks used for user analytics and returning submitted media, please refer to the Advanced Callbacks section of this document.
To receive the result from a completed workflow, you should pass a callback to the instance of OnfidoFlow. The following code is provided as an example:
Swift
1onfidoRun.with(responseHandler: { (response: OnfidoResponse) in2 switch response {3 case .success:4 // User completed the flow56 case .cancel(let cancellationReason):7 // Flow cancelled by user8 print(cancellationReason)910 case .error(let error):11 // Error occurred12 print(error)1314 }15},16 dismissFlowOnCompletion: true)17 // Dismiss the whole flow when the user completes it, and return back to the integrator view
| ATTRIBUTE | NOTES |
|---|---|
| .success | Callback that fires when all interactive tasks in the workflow have been completed. On success, if you have configured webhooks, a notification will be sent to your backend confirming the workflow run has finished. You do not need to create a check using your backend as this is handled directly by the workflow |
| .error(Error) | Callback that fires when an error occurs |
| .cancel | Callback that fires when the workflow was exited prematurely by the user. The reason can be .userExit or .consentDenied |
Error handling
The Error object returned as part of OnfidoResponse.error(Error) is of type OnfidoFlowError. It's an enum with multiple cases depending on the error type.
1switch response {2 case let OnfidoResponse.error(error):3 switch error {4 case OnfidoFlowError.cameraPermission:5 // This error is thrown if the user denies permission to the SDK during the flow6 case OnfidoFlowError.failedToWriteToDisk:7 // This error is thrown when the SDK tries to save capture to disk, maybe due to a lack of space8 case OnfidoFlowError.microphonePermission:9 // This error is thrown when the user denies permission for microphone usage by the app during the flow10 case OnfidoFlowError.upload(let OnfidoApiError):11 // This error is thrown when the SDK receives an error from an API call12 // See https://documentation.onfido.com/api/latest#errors for more information13 case OnfidoFlowError.exception(withError: let error, withMessage: let message):14 // This error is thrown when an unexpected error occurs15 // Please email [Customer support](mailto:supportonfido.com) when this happens16 case OnfidoFlowError.versionInsufficient:17 // This error is thrown when you are using an older version of the iOS SDK and trying18 // to access a new functionality from workflow. You can fix this by updating the SDK19 case OnfidoFlowError.studioTaskAbandoned:20 // This error is thrown when the workflow run (instance) is no longer available either due to it expiring or being completed already21 case OnfidoFlowError.studioTaskError:22 // This error is thrown when the workflow run can no longer be executed and returns a generic error23 case OnfidoFlowError.invalidImageData:24 // This error is thrown when the SDK is unable to compress the image captured by the user before uploading it2526 default: // necessary because of Swift27 }28}
Generating verification reports
While the SDK is responsible for capturing and uploading the user's media and data, identity verification reports themselves are generated based on workflows created using Onfido Studio.
For a step-by-step walkthrough of creating an identity verification using Onfido Studio and our SDKs, please refer to our Quick Start Guide.
If your application initializes the Onfido iOS SDK using the options defined in the Advanced customization section of this document, you may create checks and retrieve report results manually using the Onfido API. You may also configure webhooks to be notified asynchronously when the report results have been generated.
Advanced flow customization
This section on 'Advanced customization' refers to the process of initializing the Onfido iOS SDK without the use of Onfido Studio. This process requires a manual definition of the verification steps and their configuration.
These flow step parameters are mutually exclusive with workflowRunId, requiring an alternative method of instantiating the client and starting the flow.
Note that this initialization process is not recommended as the majority of new features are exclusively released for Studio workflows.
Manual SDK authentication
The SDK is authenticated using SDK tokens. As each SDK token must be specific to a given applicant and session, a new token must be generated each time you initialize the Onfido iOS SDK.
| Parameter | Notes |
|---|---|
applicant_id | required Specifies the applicant for the SDK instance. |
application_id | required The application ID (for iOS "application bundle ID") that was set up during development. For iOS, this is usually in the form com.your-company.app-name. Make sure to use a valid application_id or you'll receive a 401 error. |
For details on how to manually generate SDK tokens, please refer to POST /sdk_token/ definition in the Onfido API reference.
Note: You must never use API tokens in the frontend of your application as malicious users could discover them in your source code. You should only use them on your server.
Managing SDK Token Expiry with expireHandler
When manually generating SDK tokens, it's important to note that they expire after 90 minutes.
With this in mind, we recommend you use the optional expireHandler parameter in the SDK token configuration function to generate and pass a new SDK token when it expires. This ensures the SDK continues its flow even after an SDK token has expired.
For example:
Swift
1func getSDKToken(_ completion: @escaping (String) -> Void) {2 // Your network request logic to retrieve SDK token goes here3 completion(myNewSDKtoken)4}56let config = try OnfidoConfig.builder()7 .withSDKToken("<YOUR_SDK_TOKEN>", expireHandler: getSDKToken)
Objective-C
1-(void) getSDKToken: (void(^)(NSString *)) handler {2 // <Your network request logic to retrieve SDK token goes here>3 handler(sdkToken);4}56ONFlowConfigBuilder *configBuilder = [ONFlowConfig builder];7[configBuilder withSdkToken:@"YOUR_SDK_TOKEN" expireHandler:^(void (^ handler)(NSString * expireHandler)) {8 [self getSDKToken:handler];9}];
Create the SDK configuration
Once you have added the SDK dependency, and you have an applicant ID, you can manually configure the SDK flow steps:
Swift
1let config = try OnfidoConfig.builder()2 .withSDKToken("<YOUR_SDK_TOKEN>")3 .withWelcomeStep()4 .withDocumentStep()5 .withProofOfAddressStep()6 .withFaceStep(ofVariant: .photo(withConfiguration: nil))7 .build()89let onfidoFlow = OnfidoFlow(withConfiguration: config)10 .with(responseHandler: { results in11 // Callback when flow ends12 })
Objective-C
1ONFlowConfigBuilder *configBuilder = [ONFlowConfig builder];23[configBuilder withSdkToken:@"YOUR_SDK_TOKEN"];4[configBuilder withWelcomeStep];5[configBuilder withDocumentStep];6[configBuilder withProofOfAddressStep];78NSError *variantConfigError = NULL;9Builder *variantBuilder = [ONFaceStepVariantConfig builder];10[variantBuilder withPhotoCaptureWithConfig: NULL];11[configBuilder withFaceStepOfVariant: [variantBuilder buildAndReturnError: &variantConfigError]];1213if (variantConfigError == NULL) {14 NSError *configError = NULL;15 ONFlowConfig *config = [configBuilder buildAndReturnError:&configError];1617 if (configError == NULL) {18 ONFlow *onFlow = [[ONFlow alloc] initWithFlowConfiguration:config];19 [onFlow withResponseHandler:^(ONFlowResponse *response) {20 // Callback when flow ends21 }];22 }23}
Start the flow
Swift
1try onfidoRun.run(from: yourViewController, animated: true)
Objective-C
1NSError *runError = NULL;2[onFlow runFrom:yourViewController animated:YES error:&runError completion:nil];34if (runError != NULL) {5 // do fallback logic6}
Advanced UI customization
Appearance and Colors
To customize the look and feel of the SDK, you can pass the required CSS values to the Appearance object in the root of the OnfidoConfig.builder() object.
Swift
1let appearance = Appearance()2appearance.primaryColor = <DESIRED_UI_COLOR_HERE>3appearance.primaryTitleColor = <DESIRED_UI_COLOR_HERE>
Objective-C
1ONAppearance *appearance = [[ONAppearance alloc] init];2appearance.primaryColor = <DESIRED_UI_COLOR_HERE>;3appearance.primaryTitleColor = <DESIRED_UI_COLOR_HERE>;
To apply the appearance, you can use the methods below:
Swift
1let configBuilder = OnfidoConfig.builder()2configBuilder.withAppearance(appearance)
Objective-C
1ONFlowConfigBuilder *configBuilder = [ONFlowConfig builder];2[configBuilder withAppearance:appearance];
Please refer to the SDK customization documentation for details of the supported UI options that can be set in this property.
Flow customization
You can customize the flow of the SDK by adding steps to the SDK flow.
The possible steps include:
| Step | Description |
|---|---|
withWelcomeStep | Welcome screen shown to the user with preliminary instructions. Customization options include modification to the text elements and instructions shown to the user. |
withDocumentStep | Set of screens that control the capture via photo or upload of the user's document. Numerous customization options are available to define the document list presented to the user and the overall capture experience. |
withFaceStep | Set of screens that control the capture of a selfie, video or motion capture of the user. The customization options allow the selection of the capture variant. |
withProofOfAddressStep | Screen where the user selects the issuing country and type of document to verify their address. |
Welcome step
This step is the introduction screen of the SDK. It introduces the process and prepares the user for the steps they will need to complete.
While this screen is optional, we only recommend its removal if you already have your own identity verification welcome screen in place.
You can show the welcome screen by calling configBuilder.withWelcomeStep() in Swift
or [configBuilder withWelcomeStep] in Objective-C.
Swift
1let config = try OnfidoConfig.builder()2 .withWelcomeStep()3 ...4 .build()
Objective-C
1ONFlowConfigBuilder *configBuilder = [ONFlowConfig builder];2[configBuilder withSdkToken:@"YOUR_SDK_TOKEN_HERE"];3...4[configBuilder withWelcomeStep];56NSError *configError = NULL;7ONFlowConfig *config = [configBuilder buildAndReturnError:&configError];89if (configError) {10 // Handle config build error11} else {12 // use config13}
Consent step
This step contains the consent language required when you offer your service to US users, as well as links to Onfido's policies and terms of use. For applicants created with a location parameter value of the United States, consent collection is mandatory.
The user must click "Accept" to move past this step and continue with the flow. The content is available in English only, and is not translatable.
Note: This step does not automatically inform Onfido that the user has given their consent:
- When creating checks using API v3.3 or lower, you need to set the value of the API parameter
privacy_notices_read_consent_given(now deprecated) at the end of the SDK flow when creating a check - From API v3.4 onwards, user consent is confirmed when creating or updating an applicant using the consents parameter
If you choose to disable Onfido’s SDK Consent step, you must still incorporate the required consent language and links to Onfido's policies and terms of use into your own application's flow before your users start interacting with the Onfido SDK.
For more information about this step, and how to collect user consent, please visit Onfido Privacy Notices and Consent.
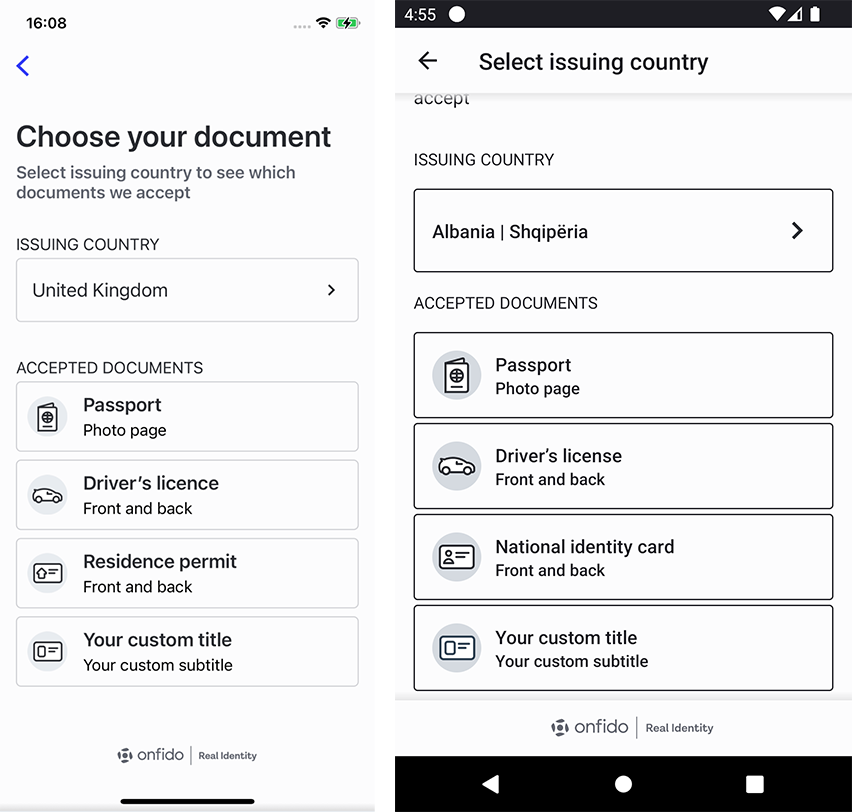
Document step
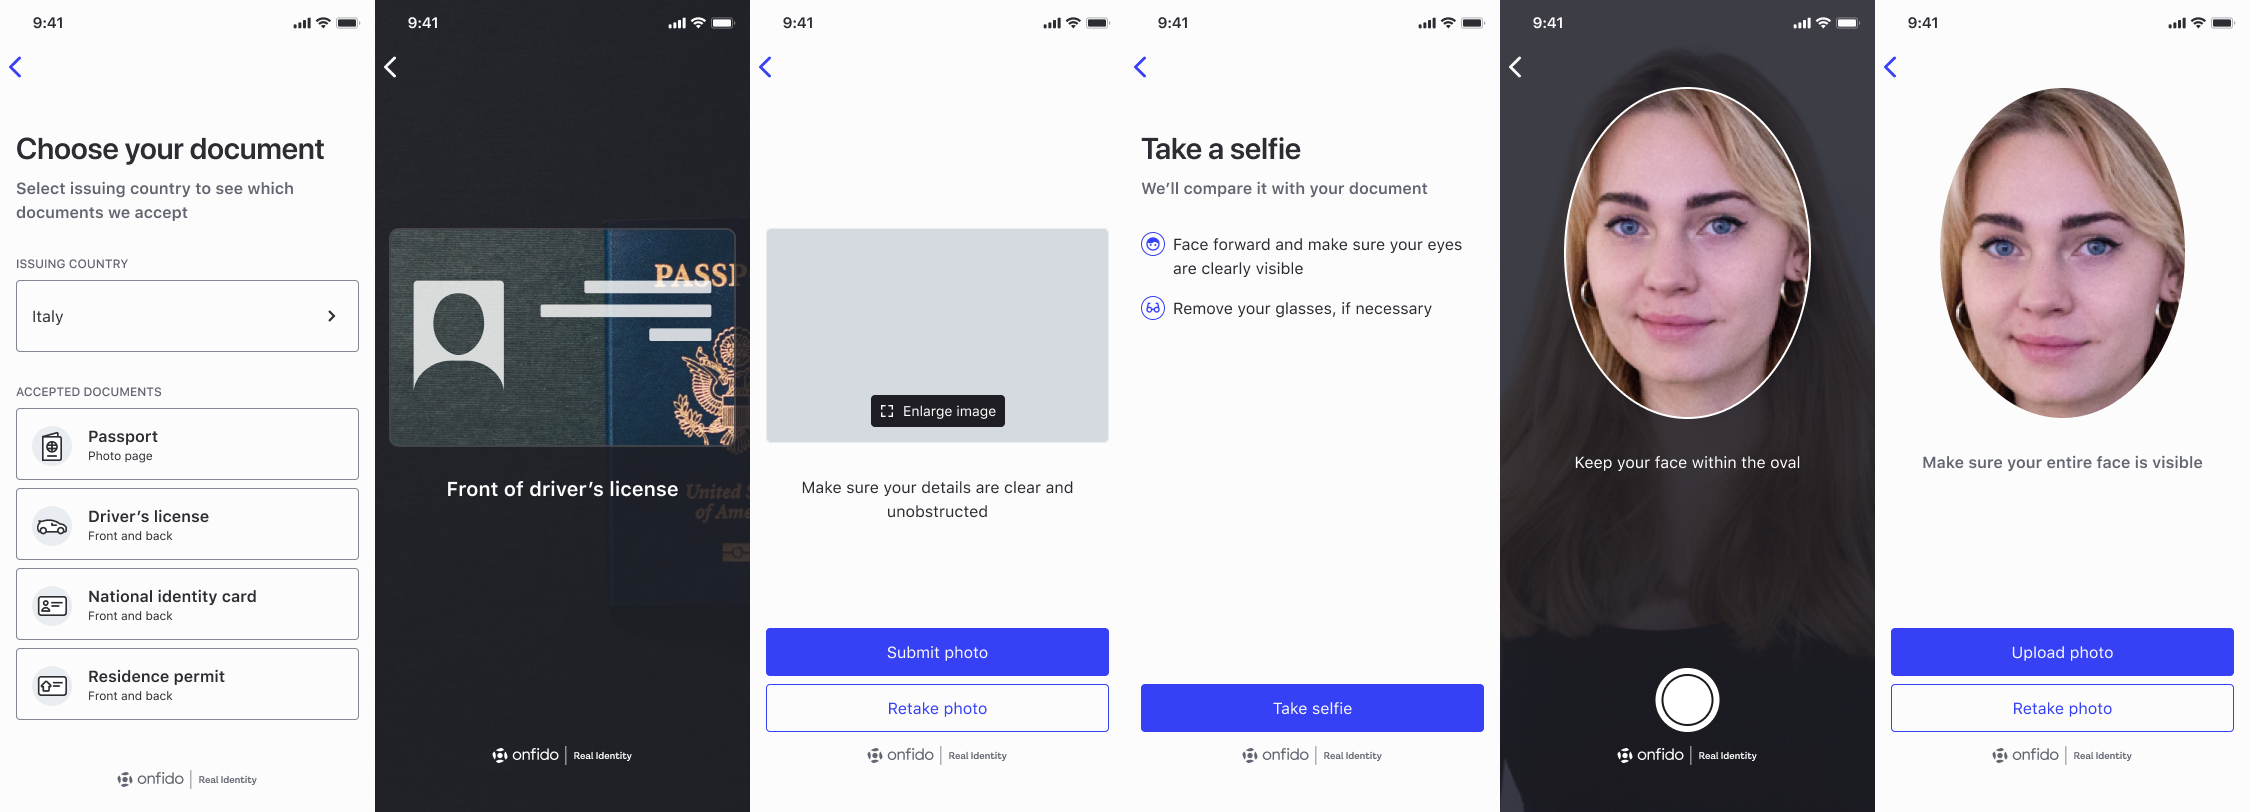
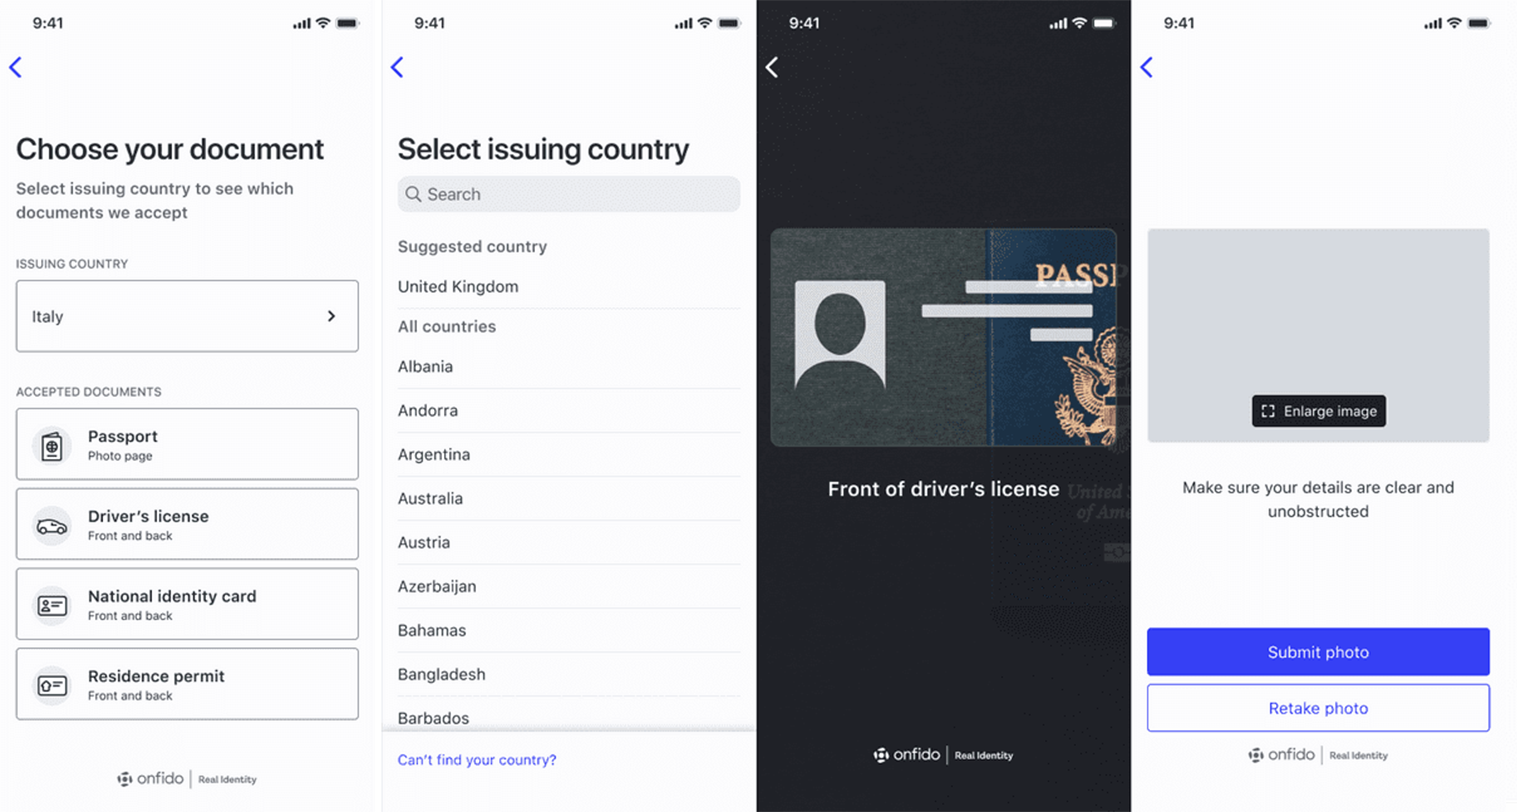
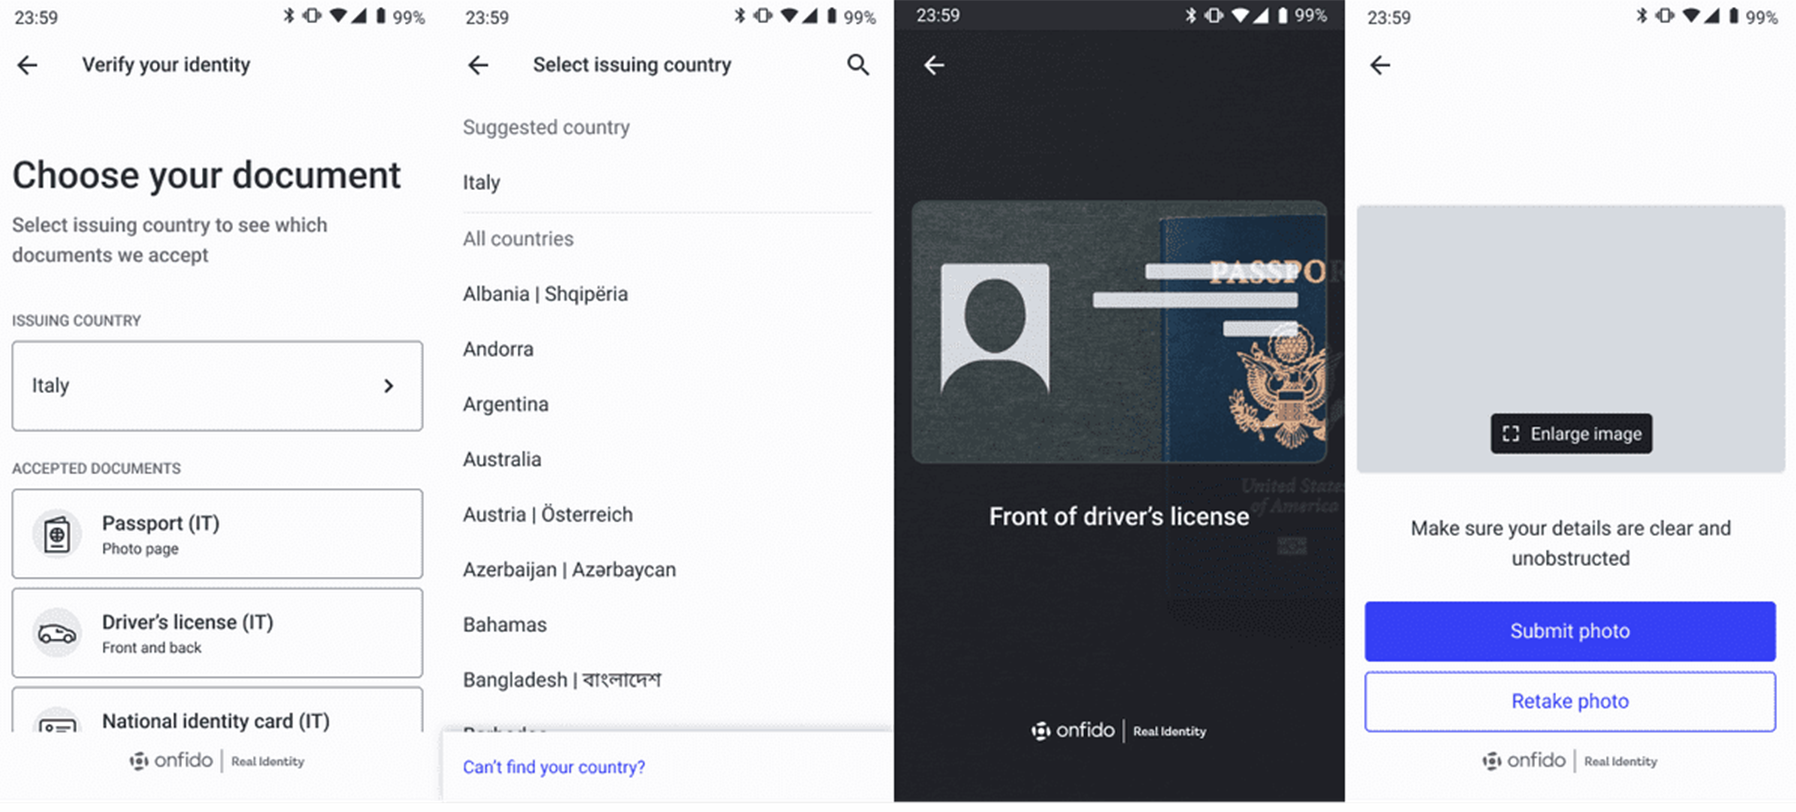
In the Document Capture step, an end user can select the issuing country and document type before capture. In a very limited number of cases, the end user may also be asked if they have a card or paper version of their document.
This information is used to optimize the capture experience, as well as inform the end user about which documents they are allowed to use.
This selection screen is dynamic, and will be automatically hidden where the end user is not required to indicate which document will be captured.
By default, the country selection will be pre-populated based on the end user’s language, as set in iOS "Settings > General > Language & Region", but the end user can select another country from the list where allowed.
You can specify allowed issuing countries and document types for the document capture step in one of three ways:
- Onfido Studio: If you are using Onfido Studio, this is configured within the Document Capture task, as documented in the Studio Product Guide
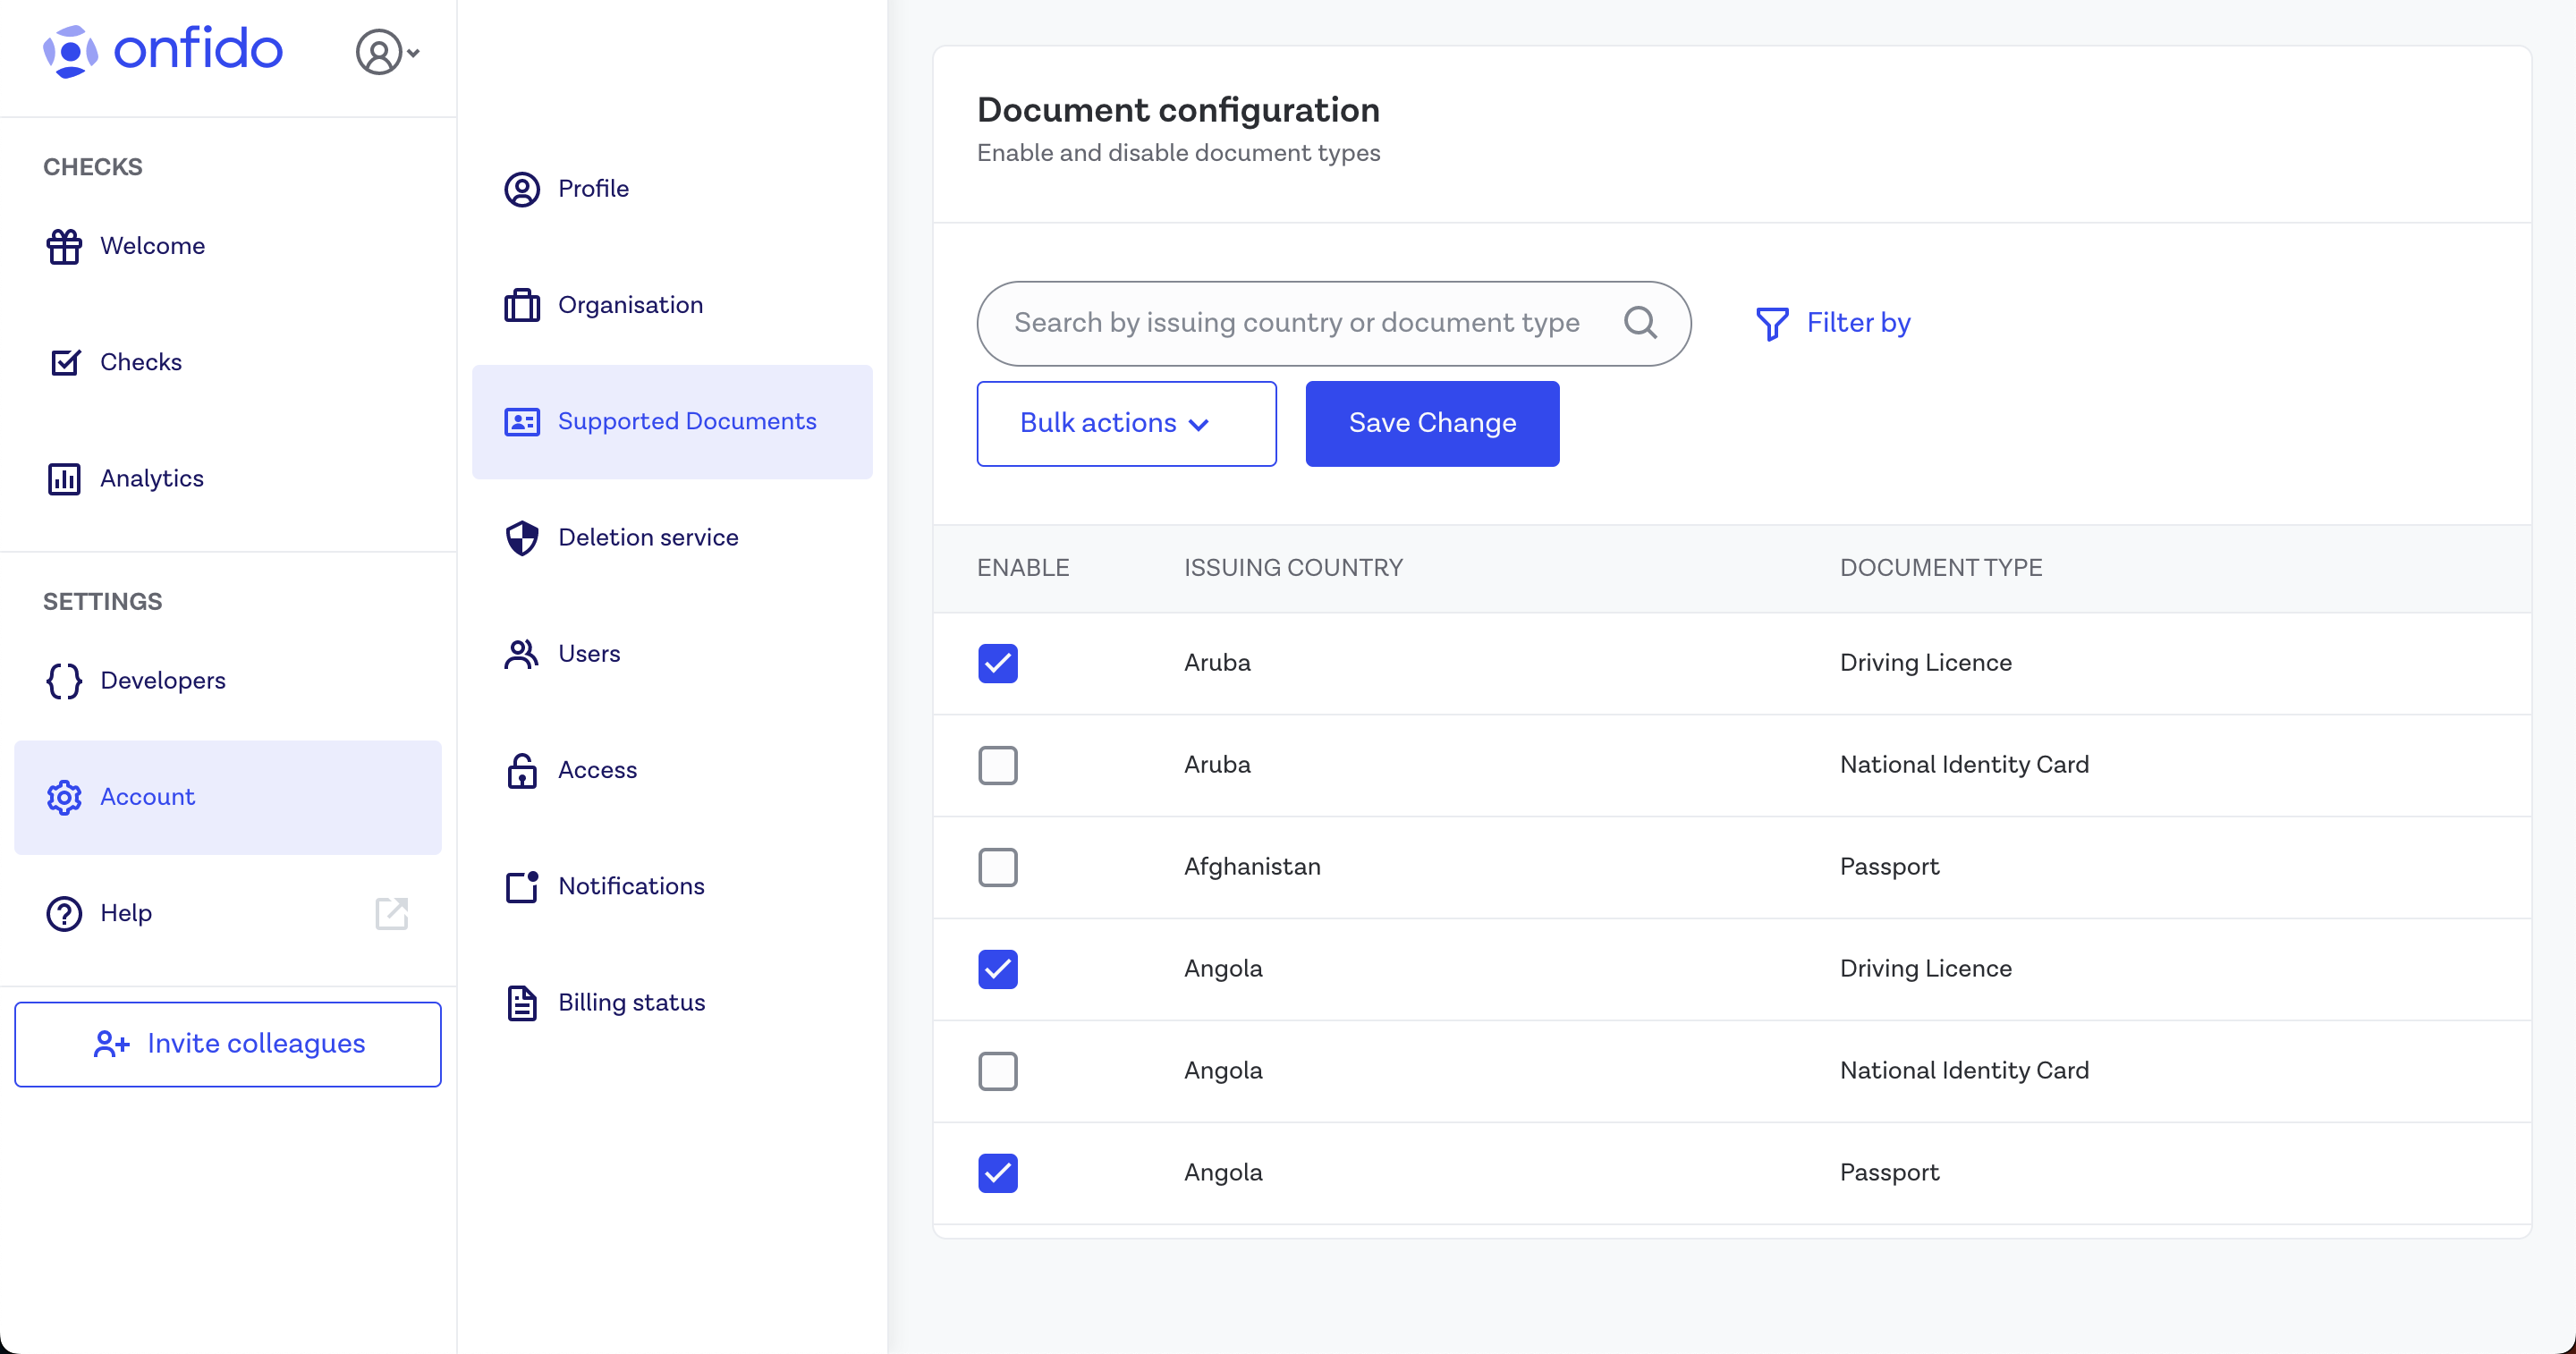
- Otherwise, the recommended approach is to apply this configuration globally in the Dashboard under Accounts \ Supported Documents. This option also ensures that the list is enforced as part of the Document Report validation. Any document that has been uploaded by an end user against your guidance will result in a Document Report sub-result of "rejected" and be flagged as
Image Integrity > Supported Document.
Country and document type selection by Dashboard
Configuring the issuing country and document type selection step using your Dashboard is the recommended method of customization (available from iOS SDK version 28.0.0 and Android SDK version 16.0.0 onwards), as this configuration is also applied to your Document Reports.
We will be rolling out Dashboard-based configuration of allowed documents soon. In the meantime, contact support@onfido.com or your Customer Support Manager to request access to this feature.
- Open the Accounts tab on your Dashboard then click Supported Documents
- You will be presented with a list of all available countries and their associated supported documents. Make your selection, then click Save Change
Please note the following SDK behaviour:
- Hard coding any document type and issuing country configuration in your SDK integration will fully override the Dashboard-based settings
- Currently, only passport, national ID card, driving licence and residence permit are visible for document selection by the end user in the SDK. If you nominate other document types in your Dashboard (visa, for example), these will not be displayed in the user interface
- If you need to add other document types to the document selection screen, you can mitigate this limitation in the near-term, using the Custom Document feature
- If for any reason the configuration fails or is not enabled, the SDK will fallback to display the selection screen for the complete list of documents supported within the selection screens
Country and document type selection - SDK integration code
If you want to use your own custom document selection UI instead of displaying the Onfido document selection screen, you will need to specify the document details during SDK initialization.
The document selection screen will be skipped automatically when the single document type is specified.
The SDK will accept the following:
- The Document Type is required. This controls fundamental SDK document capture behaviour
- The Country is optional, but recommended. This enables any optimizations the SDK may have for this specific document issued by this country
- The Document Format is optional, and only accepted for French driving licence, Italian national identity card and
South African national identity card. This defaults to
Card, representing modern forms of these documents. If the end user indicates that they have an older, paper version of one of these documents, useFoldedto ensure an optimized capture experience
Note: You may still wish to configure the Dashboard-based approach to ensure that the Document Report also rejects any document that has been uploaded by an end user against your guidance.
- Document type
The list of document types visible for the user to select can be shown or hidden using this option. Each document type has its own configuration class. While configuring document type, you can optionally pass a configuration object along with the document type.
The following document types are supported:
| Document Type | Configuration Class | Configurable Properties |
|---|---|---|
| passport | PassportConfiguration | - country |
| drivingLicence | DrivingLicenceConfiguration | - country - documentFormat |
| nationalIdentityCard | NationalIdentityConfiguration | - country - documentFormat |
| residencePermit | ResidencePermitConfiguration | - country |
| visa | VisaConfiguration | - country |
| workPermit | WorkPermitConfiguration | - country |
| generic | GenericDocumentConfiguration | - title - subtitle - country - pages |
Note: Generic document type doesn't offer an optimized capture experience for a desired document type.
Note: If only one document type is specified, users will not see the selection screen and will be taken directly to the capture screen.
- Document country
Country configuration allows you to specify the country of origin of the document. This is optional, but recommended. This enables any optimizations the SDK may have for this specific document issued by this country.
You'll need to pass the corresponding ISO 3166-1 alpha-3 country code to the SDK.
Note: You can specify country for all document types except passport. This is because passports have the same
format worldwide so the SDK does not require this additional information.
Note:: The SDK will throw a OnfidoConfigError.invalidCountryCode (ONFlowConfigErrorInvalidCountryCode) error
if an invalid country code is provided.
For example, to only capture UK driving licenses:
Swift
1let config = try OnfidoConfig.builder()2 .withSDKToken("<YOUR_SDK_TOKEN_HERE>")3 .withDocumentStep(ofType: .drivingLicence(config: DrivingLicenceConfiguration(country: "GBR")))4 .build()
Objective-C
1ONFlowConfigBuilder *configBuilder = [ONFlowConfig builder];2[configBuilder withSdkToken:@"YOUR_SDK_TOKEN_HERE"];34NSError *documentConfigError = NULL;5DocumentConfigBuilder *documentConfigBuilder = [ONDocumentTypeConfig builder];6[documentConfigBuilder withDrivingLicenceWithConfig:[[DrivingLicenceConfiguration alloc] initWithCountry: @"GBR"]];7ONDocumentTypeConfig *documentTypeConfig = [documentConfigBuilder buildAndReturnError: documentConfigError];89if (documentConfigError) {10 // Handle variant config error11} else {12 NSError *configError = NULL;13 [configBuilder withDocumentStepOfType:documentTypeConfig];14 ONFlowConfig *config = [configBuilder buildAndReturnError:&configError];15}
- Document format
The Document Format is optional, and only accepted for French driving licence, Italian national identity card and South African national identity card. This defaults to Card, representing modern forms of these documents. If the end user indicates that they have an older, paper version of one of these documents, use Folded to ensure an optimized capture
experience.
If Folded is configured, the SDK will show a specific template overlay during document capture.
The following document formats are supported for each document type:
| Document Type/ Document Format | card | folded |
|---|---|---|
| drivingLicence | ALL COUNTRIES | Only France (Country code "FRA") |
| nationalIdentityCard | ALL COUNTRIES | Italy (Country code "ITA") South Africa (Country code "ZAF") |
| Document Type/ Document Format | |
|---|---|
| passport | NOT CONFIGURABLE |
| residencePermit | NOT CONFIGURABLE |
| visa | NOT CONFIGURABLE |
| workPermit | NOT CONFIGURABLE |
| generic | NOT CONFIGURABLE |
Note: If you configure the SDK with an unsupported document format, the SDK will throw
an OnfidoConfigError.invalidDocumentFormatAndCountryCombination (ONFlowConfigErrorInvalidDocumentFormatAndCountryCombination
in Objective-C) error during runtime.
For example, for a folded Italian national identity card:
Swift
1let config = try OnfidoConfig.builder()2 .withSDKToken("YOUR_SDK_TOKEN_HERE")3 .withDocumentStep(ofType: .nationalIdentityCard(config: NationalIdentityConfiguration(documentFormat: .folded, country: "ITA")))4 .build()
Objective-C
1ONFlowConfigBuilder *configBuilder = [ONFlowConfig builder];2[configBuilder withSdkToken:@"YOUR_SDK_TOKEN_HERE"];34NSError *documentConfigError = NULL;5DocumentConfigBuilder *documentConfigBuilder = [ONDocumentTypeConfig builder];6[documentConfigBuilder withNationalIdentityCardWithConfig:[[NationalIdentityConfiguration alloc] initWithDocumentFormat:DocumentFormatFolded country: @"ITA"]];7ONDocumentTypeConfig *documentTypeConfig = [documentConfigBuilder buildAndReturnError: documentConfigError];89if (documentConfigError) {10 // Handle variant config error11} else {12 NSError *configError = NULL;13 [configBuilder withDocumentStepOfType:documentTypeConfig];14 ONFlowConfig *config = [configBuilder buildAndReturnError:&configError];15}
- Customize the issuing country and document type selection screen with pre-selected documents
You can also customize the screen to display only a limited list of document types, using the configuration function to specify the ones you want to show.
Currently you can only include passport, identityCard, drivingLicence, residencePermit in the list.
For example, to show only the passport and drivingLicence document types:
Swift
1let config = try OnfidoConfig.builder()2 .withDocumentStep(ofSelectableTypes: [.passport, .drivingLicence])
Objective-C
1ONFlowConfigBuilder *configBuilder = [ONFlowConfig builder];2[configBuilder withDocumentStepWithSelectableDocumentTypes: @[@(SelectableDocumentTypePassport), @(SelectableDocumentTypeDrivingLicence)]];
- Adding custom documents by SDK integration code You can also capture custom documents that Onfido does not fully support in the SDK by using the Generic document type.
This can be useful for running the Document Report on documents that are supported in the Onfido platform, but are not yet present in the SDK, or for changing the default name of the document type presented to the user or the default number of sides/pages the user will be asked to capture.
The Generic document type supports limited on-device image quality checks. Use the standard document types where available for an improved capture experience.
A custom document consists of the following information:
- Title (required): Displayed in the document selection screen
- Subtitle (optional): Displayed in the document selection screen below the title
- Country (required): To support multiple countries, create a custom document for each country
- Pages (required): Tells the SDK The number of document pages to be captured. Currently supporting one or two sides/pages
It is recommended to provide pre-translated title and subtitle strings when you initialize the SDK, as these custom strings are not translated internally.
Here are several options when adding custom documents:
- Adding the custom documents per country on top of the documents we support. You can add more than one custom document. If you require documents for multiple countries, you will have to add each document for each country.
Swift
1let config = try! OnfidoConfig.builder()2 .withSDKToken("YOUR_SDK_TOKEN_HERE")3 .withGenericDocuments(additionalTypes: [4 .generic(config: GenericDocumentConfiguration(title: "Tax ID", country: "PHL", pages: .frontAndBack))5 .generic(config: GenericDocumentConfiguration(title: "Voter's ID", subtitle: "your voting ID", country: "PHL", pages: .single))6 ])7 .build()
Objective-C
1ONFlowConfigBuilder *configBuilder = [ONFlowConfig builder];2[configBuilder withSdkToken:@"YOUR_SDK_TOKEN_HERE"];34NSError *documentConfigError = NULL;5DocumentConfigBuilder * documentConfigBuilder = [ONDocumentTypeConfig builder];6[documentConfigBuilder withGenericWithConfig:[[GenericDocumentConfiguration alloc] initWithTitle: @"Tax ID" subtitle: nil country: @"PHL" pages: ONDocumentPagesFrontAndBack]];7[documentConfigBuilder withGenericWithConfig:[[GenericDocumentConfiguration alloc] initWithTitle: @"Voter's ID" subtitle: @"your voting ID" country: @"PHL" pages: ONDocumentPagesSingle]];8ONDocumentTypeConfig *documentTypeConfig = [documentConfigBuilder buildAndReturnError: documentConfigError];910if (documentConfigError) {11 // Handle variant config error12} else {13 NSError *configError = NULL;14 [configBuilder withGenericDocumentsWithAdditionalTypes:documentTypeConfig];15 ONFlowConfig *config = [configBuilder buildAndReturnError:&configError];16}
- Preselect documents to show in the document selection screen and include custom documents for a specific country (custom documents will only be shown if the country configured is the same as the country selected).
Swift
1let config = try! OnfidoConfig.builder()2 .withSDKToken("YOUR_SDK_TOKEN_HERE")3 .withDocumentStep(ofSelectableTypes: [.passport, .drivingLicence])4 .withGenericDocuments(additionalTypes: [5 .generic(config: GenericDocumentConfiguration(title: "Tax ID", country: "PHL", pages: .frontAndBack))6 .generic(config: GenericDocumentConfiguration(title: "Voter's ID", subtitle: "your voting ID", country: "PHL", pages: .single))7 ])8 .build()
Objective-C
1ONFlowConfigBuilder *configBuilder = [ONFlowConfig builder];2[configBuilder withSdkToken:@"YOUR_SDK_TOKEN_HERE"];34NSError *documentConfigError = NULL;5DocumentConfigBuilder *documentConfigBuilder = [ONDocumentTypeConfig builder];6[documentConfigBuilder withDocumentStepWithSelectableDocumentTypes: @[@(SelectableDocumentTypePassport), @(SelectableDocumentTypeDrivingLicence)]];7[documentConfigBuilder withGenericWithConfig:[[GenericDocumentConfiguration alloc] initWithTitle: @"Tax ID" subtitle: nil country: @"PHL" pages: ONDocumentPagesFrontAndBack]];8[documentConfigBuilder withGenericWithConfig:[[GenericDocumentConfiguration alloc] initWithTitle: @"Voter's ID" subtitle: @"your voting ID" country: @"PHL" pages: ONDocumentPagesSingle]];9ONDocumentTypeConfig *documentTypeConfig = [documentConfigBuilder buildAndReturnError: documentConfigError];1011if (documentConfigError) {12 // Handle variant config error13} else {14 NSError *configError = NULL;15 [configBuilder withGenericDocumentsWithAdditionalTypes:documentTypeConfig];16 ONFlowConfig *config = [configBuilder buildAndReturnError:&configError];17}
- Add a custom document and skip the document/country selection screen. This can only be done when adding only 1 document.
Swift
1let config = try! OnfidoConfig.builder()2 .withSDKToken("YOUR_SDK_TOKEN_HERE")3 .withDocumentStep(ofType:.generic(config:4 GenericDocumentConfiguration(title: "Voter's ID", subtitle: "your voting ID", country: "PHL", pages: .single))5 )6 .build()
Objective-C
1ONFlowConfigBuilder *configBuilder = [ONFlowConfig builder];2[configBuilder withSdkToken:@"YOUR_SDK_TOKEN_HERE"];34NSError *documentConfigError = NULL;5DocumentConfigBuilder *documentConfigBuilder = [ONDocumentTypeConfig builder];6[documentConfigBuilder withGenericWithConfig:[[GenericDocumentConfiguration alloc] initWithTitle: @"Tax ID" subtitle: nil country: @"PHL" pages: ONDocumentPagesSingle]];7ONDocumentTypeConfig *documentTypeConfig = [documentConfigBuilder buildAndReturnError: documentConfigError];89if (documentConfigError) {10 // Handle variant config error11} else {12 NSError *configError = NULL;13 [configBuilder withDocumentStepOfType:documentTypeConfig];14 ONFlowConfig *config = [configBuilder buildAndReturnError:&configError];15}
Note:
- Adding an empty title will throw an error
OnfidoConfigError.invalidDocumentTitle - Adding duplicate documents (same title and country) will also throw an error
OnfidoConfigError.duplicateGenericDocument - Custom Documents are not currently compatible with the Dashboard-based configuration method or with Studio
- When using a Custom Document to force the single-sided capture of a document that Onfido would usually capture two sides for, the Document Report may return a Caution for Image Integrity > Conclusive Document Quality > missing_back) as the back of certain documents contain expected data points or fraud features. You may wish to customize your result processing logic to accommodate this
Face step
In the Face step, a user can use the front camera of their device to capture a live photo of their face (photo), a live video (video) or a motion capture using the Motion product (Motion).
Objective-C
For the Objective-C interface, you should use ONFaceStepVariantConfig as shown below.
To configure for a live photo:
1NSError * error;2Builder * variantBuilder = [ONFaceStepVariantConfig builder];3[variantBuilder withPhotoCaptureWithConfig: [[PhotoStepConfiguration alloc] initWithShowSelfieIntroScreen: YES]]];4[configBuilder withFaceStepOfVariant: [variantBuilder buildAndReturnError: &error]];
To configure for a live video:
1NSError * error;2Builder * variantBuilder = [ONFaceStepVariantConfig builder];3[variantBuilder withVideoCaptureWithConfig:4 [[VideoStepConfiguration alloc] initWithShowIntroVideo: YES manualLivenessCapture: NO]];5[configBuilder withFaceStepOfVariant: [variantBuilder buildAndReturnError: &error]];
To configure for Motion:
1NSError * error;2Builder * variantBuilder = [ONFaceStepVariantConfig builder];3[variantBuilder withMotionWithConfig: NULL];4[configBuilder withFaceStepOfVariant: [variantBuilder buildAndReturnError: &error]];
To configure for Motion with audio recording:
Motion supports audio recording, but it is disabled by default. This can, however, be enabled to allow the recording of the user's background audio. If a user does not opt into granting microphone permissions, they cannot proceed with the Motion flow, and no video can be created or uploaded.
1NSError * error;2Builder * variantBuilder = [ONFaceStepVariantConfig builder];3[variantBuilder withMotionWithConfig: [[MotionStepConfiguration alloc] initWithRecordAudio: YES]];4[configBuilder withFaceStepOfVariant: [variantBuilder buildAndReturnError: &error]];
To configure for Motion without intro screen:
The intro screens are designed to give end-users clear context on what actions they need to take and why these actions are necessary. Removing this screen could lead to confusion and higher drop-off rates, as users might not understand what is required of them and choose to abandon the process. It is crucial, especially during onboarding, to provide a similar level of guidance if the intro screen is removed, ensuring users are still well-informed. However, when re-verifying returning users who are already familiar with the flow, skipping the intro screen may enhance the user experience by streamlining the process and eliminating unnecessary steps.
1NSError * error;2Builder * variantBuilder = [ONFaceStepVariantConfig builder];3[variantBuilder withMotionWithConfig: [[MotionStepConfiguration alloc] initWithShowIntro: NO]];4[configBuilder withFaceStepOfVariant: [variantBuilder buildAndReturnError: &error]];
Swift
The Face step has 3 variants for the Swift interface:
FaceStepVariant.photo(with: PhotoStepConfiguration?)FaceStepVariant.video(with: VideoStepConfiguration?)FaceStepVariant.motion(with: MotionStepConfiguration?)
To configure for a live photo:
1let config = try OnfidoConfig.builder()2 .withSDKToken("<YOUR_SDK_TOKEN_HERE>")3 .withWelcomeStep()4 .withDocumentStep()5 .withFaceStep(ofVariant: .photo(withConfiguration: PhotoStepConfiguration(showSelfieIntroScreen: true)))6 .build()
To configure for a live video:
1let config = try OnfidoConfig.builder()2 .withSDKToken("<YOUR_SDK_TOKEN_HERE>")3 .withWelcomeStep()4 .withDocumentStep()5 .withFaceStep(ofVariant: .video(withConfiguration: VideoStepConfiguration(showIntroVideo: true, manualLivenessCapture: false)))6 .build()
To configure for Motion:
1let config = try OnfidoConfig.builder()2 .withSDKToken("<YOUR_SDK_TOKEN_HERE>")3 .withWelcomeStep()4 .withDocumentStep()5 .withFaceStep(ofVariant: .motion(withConfiguration: nil))6 .build()
To configure for Motion with audio recording:
Motion supports audio recording, but it is disabled by default. This can, however, be enabled to allow the recording of the user's background audio. If a user does not opt into granting microphone permissions, they cannot proceed with the Motion flow, and no video can be created or uploaded.
1let config = try OnfidoConfig.builder()2 .withSDKToken("<YOUR_SDK_TOKEN_HERE>")3 .withWelcomeStep()4 .withDocumentStep()5 .withFaceStep(ofVariant: .motion(withConfiguration: MotionStepConfiguration(recordAudio: true)))6 .build()
To configure for Motion without intro screen:
The intro screens are designed to give end-users clear context on what actions they need to take and why these actions are necessary. Removing this screen could lead to confusion and higher drop-off rates, as users might not understand what is required of them and choose to abandon the process. It is crucial, especially during onboarding, to provide a similar level of guidance if the intro screen is removed, ensuring users are still well-informed. However, when re-verifying returning users who are already familiar with the flow, skipping the intro screen may enhance the user experience by streamlining the process and eliminating unnecessary steps.
1let config = try OnfidoConfig.builder()2 .withSDKToken("<YOUR_SDK_TOKEN_HERE>")3 .withWelcomeStep()4 .withDocumentStep()5 .withFaceStep(ofVariant: .motion(withConfiguration: MotionStepConfiguration(showIntro: false)))6 .build()
Proof of Address step
In the Proof of Address step, a user picks the issuing country and type of document that proves their address before capturing the document with their device camera or uploading it.
Swift
1let config = try OnfidoConfig.builder()2 .withSDKToken("<YOUR_SDK_TOKEN_HERE>")3 .withProofOfAddressStep()4 .build()
Objective-C
1ONFlowConfigBuilder *configBuilder = [ONFlowConfig builder];2[configBuilder withSdkToken:@"YOUR_SDK_TOKEN_HERE"];3[configBuilder withProofOfAddressStep];45NSError *configError = NULL;6ONFlowConfig *config = [configBuilder buildAndReturnError:&configError];78if (configError) {9 // Handle config build error10} else {11 // use config12}
Advanced callbacks
Handling callbacks
Swift
To receive the result from the flow, you should pass a callback to the instance of OnfidoFlow.
The result object passed to the callback may include the following attributes:
1let responseHandler: (OnfidoResponse) -> Void = { response in2 switch response {3 case .error(let error):4 case .success(let results):5 case .cancel(let reason):6 }7}
| Attribute | Notes |
|---|---|
.success([OnfidoResult]) | User completed the flow. You can now create a check on your backend server. |
.error(Error) | Callback that fires when an error occurs. |
.cancel | Flow was cancelled by the user. The reason can be .userExit (when the user taps back button on the first screen) or .deniedConsent (when the user denies consent on the consent screen) or .requiredNFCFlowNotCompleted (when the NFC step is required and the user did not complete it). |
Objective-C
To receive the result from the flow, you should pass a callback to the instance of ONFlow.
An instance of ONFlowResponse is passed back to the callback with 3 properties:
1(^responseHandlerBlock)(ONFlowResponse *response) {2 if (response.userCanceled) {3 } else if (response.results) {4 } else if (response.error) {5 }6}
| Properties | Notes |
|---|---|
results | User completed the flow. You can now create a check on your backend server. |
error | Callback that fires when an error occurs. |
userCanceled | Flow was cancelled by the user. You can check why the user cancelled using response.userCanceled.reason. When userCanceled is false, then results or error properties will be set. |
Success handling
Success is when the user has reached the end of the flow.
Swift
[OnfidoResult] is a list with multiple results. The results are different enum values, each with its own associated
value (also known as payload). This enum, OnfidoResult, can have the following values:
OnfidoResult.documentandOnfidoResult.face: Its payload is relevant in case you want to manipulate or preview the captures in some way.
Capture result payload
You shouldn't need to inspect the results of the document and face captures as the SDK handles file uploads. However, if you want to see further information, you can access the result object.
Example for a document capture:
1let document: Optional<OnfidoResult> = results.first { result in2 if case OnfidoResult.document = result { return true }3 return false4}56if let document,7 case OnfidoResult.document(let documentResult) = document {8 print(document.front.id)9}
To access the result object for a face capture, input the case as OnfidoResult.face.
Objective-C
[ONFlowResult] is a list with multiple results. The result is an instance of ONFlowResult containing 2 properties:
type, which is an enum with valuesONFlowResultTypeDocument,ONFlowResultTypeFaceresult, whose instance type can be ofONDocumentResultorONFaceResult. The result type can be derived by thetypeproperty
Capture result payload
You shouldn't need to inspect the results of the document and face captures as the SDK handles file uploads. However, if you want to see further information, you can access the result object.
Example for a document capture:
1NSPredicate *documentResultPredicate = [NSPredicate predicateWithBlock:^BOOL(id flowResult, NSDictionary *bindings) {2 if (((ONFlowResult *)flowResult).type == ONFlowResultTypeDocument) {3 return YES;4 } else {5 return NO;6 }7}];8NSArray *flowWithDocumentResults = [results filteredArrayUsingPredicate:documentResultPredicate];910if (flowWithDocumentResults.count > 0) {11 ONDocumentResult *documentResult = ((ONFlowResult *)flowWithDocumentResults[0]).result;12 NSLog(@"%@", documentResult.front.id);13}
Sample of instance returned by a flow with FlowStep.document, FlowStep.face and FlowStep.proofOfAddress:
1Document:2 Front: DocumentSideResult(id=document_id, side=FRONT, type=DRIVING_LICENCE, issuingCounfry=GBR)3 Back: DocumentSideResult(id=document_id, side=BACK, type=DRIVING_LICENCE, issuingCounfry=GBR)4 Type: DRIVING_LICENCE56Face:7 Face(id=face_id, variant=PHOTO)89Proof of address:10 ProofOfAddress(type=UTILITY_BILL, front=(id=front_side_id, type=(optional)), back=(id=back_side_id, type=(optional)))
To access the result object for a face capture, change the type to ONFlowResultTypeFace.
Error handling
Swift
Response Handler Errors
The Error object returned as part of OnfidoResponse.error(Error) is of type OnfidoFlowError. It's an enum with
multiple cases depending on the error type.
1switch response {2case let OnfidoResponse.error(error):3 switch error {4 case OnfidoFlowError.cameraPermission:5 // This error is thrown if the user denies permission to the SDK during the flow6 case OnfidoFlowError.microphonePermission:7 // This error is thrown when the user denies permission for microphone usage by the app during the flow8 case OnfidoFlowError.failedToWriteToDisk:9 // This error is thrown when the SDK tries to save capture to disk, maybe due to a lack of space10 case OnfidoFlowError.upload(let OnfidoApiError):11 // This error is thrown when the SDK receives an error from an API call, see [https://documentation.onfido.com/api/latest#errors](https://documentation.onfido.com/api/latest#errors) for more information12 case OnfidoFlowError.exception(withError: let error, withMessage: let message):13 // This error is thrown when an unexpected error occurs, please contact [support](mailto:support@onfido.com) when this happens14 case OnfidoFlowError.invalidImageData:15 // This error is thrown when the SDK tries to save capture to disk, but the image failed to compress to JPEG data16 case OnfidoFlowError.versionInsufficient:17 // This error is thrown when the workflow version is insufficient18 default: // necessary because swift19 }20}
Note: Not all errors will be passed to OnfidoResponse.error. Run Exceptions
and Configuration errors will be returned as an exception.
Run exceptions
When initiating the SDK there can be an exception.
You can handle run exceptions in Swift with a do/catch as shown below:
1do {2 try onfidoFlow.run(from: yourViewController, animated: true)3} catch let error {4 switch error {5 case OnfidoFlowError.cameraPermission:6 // do something about it here7 case OnfidoFlowError.microphonePermission:8 // do something about it here9 default:10 // should not happen, so if it does, log it and let us know11 }12}
Configuration errors
You must provide the following when configuring the Onfido iOS SDK:
- SDK token
- applicant
- at least one capture step
Otherwise, you may encounter the following errors when calling the build() function on the OnfidoConfig.Builder
instance:
| Error | Notes |
|---|---|
OnfidoConfigError.missingSDKToken | When no token is provided or the token is an empty string. |
OnfidoConfigError.invalidSDKToken | When an invalid token is provided. |
OnfidoConfigError.missingSteps | When no step is provided. |
OnfidoConfigError.invalidDocumentFormatAndCountryCombination | When it is an unsupported document format for the specified country provided. See Document Type Configuration to check supported combinations. |
OnfidoConfigError.invalidCountryCode | When an invalid country code is provided. |
Objective-C
Response Handler Errors
The error property of the ONFlowResponse is of type NSError.
You can identify the error by comparing the code property of the NSError instance with ONFlowError,
i.e. response.code == ONFlowErrorCameraPermission. You can also print or log the userInfo property of the NSError
instance.
The NSError contained within the ONFlowResponse's error property can be handled as follows:
1switch (error.code) {2case ONFlowErrorCameraPermission:3 // Occurs if the user denies permission to the SDK during the flow4 break;5case ONFlowErrorMicrophonePermission:6 // Occurs when the user denies permission for microphone usage by the app during the flow7 break;8case ONFlowErrorFailedToWriteToDisk:9 // Occurs when the SDK tries to save capture to disk, maybe due to a lack of space10 break;11case ONFlowErrorUpload:12 // Occurs when the SDK receives an error from an API call, see [https://documentation.onfido.com/api/latest#errors](https://documentation.onfido.com/api/latest#errors) for more information13 // you can find out more by printing or logging userInfo from error14 break;15case ONFlowErrorException:16 // Returned when an unexpected error occurs, please contact Onfido's [Customer Support](mailto:support@onfido.com) when this happens17 break;18case ONFlowErrorInvalidImageData:19 // Occurs when the SDK tries to save capture to disk, but the image failed to compress to JPEG data20 break;21case ONFlowErrorVersionInsufficient:22 // Occurs when the workflow version is insufficient23 break;24}
Note: Not all errors which are part of ONFlowError will be passed to the response handler
block. Run Exceptions and Configuration errors will be returned as an
exception.
Run exceptions
You can handle run exceptions as shown below:
1NSError *runError = NULL;2[onFlow runFrom:yourViewController animated:YES error:&runError completion:nil]; //`yourViewController` should be your view controller34if (runError) {5 switch (runError.code) {6 case ONFlowErrorCameraPermission:7 // do something about it here8 break;9 case ONFlowErrorMicrophonePermission:10 // do something about it here11 break;12 default:13 // do something about it here14 break;15 }16}
Configuration errors
You must provide the following when configuring the Onfido iOS SDK:
- SDK token
- applicant
- at least one capture step
Otherwise you may encounter the following errors when calling the build() function on the ONFlowConfigBuilder:
| Error | Notes |
|---|---|
ONFlowConfigErrorMissingToken | When no token is provided or the token is an empty string. |
ONFlowConfigErrorMissingApplicant | When no applicant instance is provided. |
ONFlowConfigErrorMissingSteps | When no step is provided. |
ONFlowConfigErrorMultipleTokenTypes | When both an SDK token and a Mobile token are provided. |
ONFlowConfigErrorApplicantProvidedWithSDKToken | When both an SDK token and an applicant are provided. |
ONFlowConfigErrorInvalidDocumentFormatAndCountryCombination | When it is an unsupported document format for the specified country provided. See Document Type Configuration to check supported combinations. |
ONFlowConfigErrorInvalidCountryCode | When an invalid country code is provided. |
Custom Media Callbacks
The following features must be enabled for your account before they can be used. For more information, please contact your Onfido Solution Engineer or Customer Success Manager.
Introduction
Onfido provides the possibility to integrate with our Smart Capture SDK, without the requirement of using this data only through the Onfido API. Media callbacks enable you to control the end user data collected by the SDK after the end user has submitted their captured media. As a result, you can leverage Onfido’s advanced on-device technology, including image quality validations, while still being able to handle end users’ data directly. This unlocks additional use cases, including compliance requirements and multi-vendor configurations, that require this additional flexibility.
This feature must be enabled for your account. Please contact your Onfido Solution Engineer or Customer Success Manager.
Implementation
To use this feature, use .withMediaCallback and provide the callbacks for MediaDocumentResult for documents
and MediaFile for live photos and live videos.
Swift
1final class SwiftDynamicFrameworkOnfidoRunner: OnfidoRunner, MediaCallback {2 func onMediaCaptured(result: MediaResult) {3 switch result {4 case let documentResult as MediaDocumentResult:5 // Your callback code here6 case let selfieResult as SelfieResult:7 // Your callback code here8 case let livenessResult as LivenessResult:9 // Your callback code here10 default:11 break12 }13 }1415 init() {16 ...17 configBuilder.withMediaCallback(mediaCallback: self)18 }19}
User data
The callbacks return an object including the information that the SDK normally sends directly to Onfido. The callbacks are invoked when the end user confirms submission of their image through the SDK’s user interface.
Note: Currently, end user data will still automatically be sent to the Onfido backend, but you are not required to use Onfido to process this data.
The callback returns 3 possible objects:
- For documents, the callback returns a
MediaDocumentResultobject:
1class MediaDocumentResult {2 let metadata: DocumentMetadata3 let file: MediaFile4}
The DocumentMetadata object contains the metadata of the captured document:
1class DocumentMetadata {2 let side: String3 let type: String4 let issuingCountry: String?5}
Note: issuingCountry is optional based on end-user selection, and can be null.
Note: If a document was scanned using NFC, the callback will return the passport photo in file, but no additional
data.
- For live photos, the callback returns a
SelfieResultobject:
1class SelfieResult {2 let fileData: MediaFile3}
- For videos, the callback returns a
LivenessResultobject:
1class LivenessResult {2 let fileData: MediaFile3}
And the MediaFile object has:
1class MediaFile {2 let fileData: Data3 let fileName: String4 let fileType: String5}
User analytics
The SDK also allows you to track a user's journey through the Onfido verification process via a definable hook.
Overriding the hook
In order to expose a user's progress through the SDK, a hook method must be defined while creating the OnfidoFlow.swift
instance using a .with(eventHandler: EventHandler) call. For example:
1OnfidoFlow(withConfiguration: config)2 .with(eventHandler: {3 (event: Event) -> () in4 // Your code here5 })
The code inside of the defined method will now be called when a particular event is triggered, usually when the user reaches a new screen. For a full list of events see, tracked events.
The parameter being passed in is an OnfidoFlow.Event struct which contains the following:
eventName | string Indicates the type of event. This will always be returned as "Screen", as each tracked event is a user visiting a screen. |
properties | dictionary Contains the specific details of an event. For example, the name of the screen visited. |
Using the data
You can use the data to keep track of how many users reach each screen in your flow. You can do this by storing the
number of users that reach each screen and comparing that to the number of users who reached the Welcome screen.
Tracked events
Below is the list of potential events currently being tracked by the hook:
1WELCOME - User reached the "Welcome" screen2USER_CONSENT - User reached "User consent" screen3DOCUMENT_CAPTURE - User reached the "Document capture" screen (for one-sided document)4DOCUMENT_CAPTURE_FRONT - User reached the "Document capture" screen for the front side (for two-sided document)5DOCUMENT_CAPTURE_BACK - User reached the "Document capture" screen for the back side (for two-sided document)6DOCUMENT_CAPTURE_CONFIRMATION - User reached the "Document confirmation" screen (for one-sided document)7DOCUMENT_CAPTURE_CONFIRMATION_FRONT - User reached the "Document confirmation" screen for the front side (for two-sided document)8DOCUMENT_CAPTURE_CONFIRMATION_BACK - User reached the "Document confirmation" screen for the back side (for two-sided document)9DOCUMENT_UPLOAD - User's document is uploading10FACIAL_INTRO - User reached the "Selfie intro" screen11FACIAL_CAPTURE - User reached the "Selfie capture" screen12FACIAL_CAPTURE_CONFIRMATION - User reached the "Selfie confirmation" screen13FACIAL_UPLOAD - User's selfie is uploading14VIDEO_FACIAL_INTRO - User reached the "Liveness intro" screen15VIDEO_FACIAL_CAPTURE - User reached the "Liveness video capture" screen16VIDEO_FACIAL_CAPTURE_STEP_1 - User reached the 1st challenge during "Liveness video capture", challenge_type can be found in eventProperties17VIDEO_FACIAL_CAPTURE_STEP_2 - User reached the 1st challenge during "Liveness video capture", challenge_type can be found in eventProperties18VIDEO_FACIAL_CAPTURE_CONFIRMATION - User reached the "Liveness video confirmation" screen19VIDEO_FACIAL_UPLOAD - User's liveness video is uploading20MOTION_FACIAL_INTRO - User reached the "Motion intro" screen21MOTION_FACIAL_ALIGNMENT - User reached the "Motion alignment" screen22MOTION_FACIAL_CAPTURE - User reached the "Motion capture" screen23MOTION_FACIAL_NO_FACE_DETECTED - User's face was not detected24MOTION_FACIAL_CAPTURE_ERROR_TIMEOUT - User's motion capture timed out25MOTION_FACIAL_CAPTURE_ERROR_TOO_FAST - User performed the motion head turn too fast26MOTION_FACIAL_UPLOAD - User's motion capture is uploading27MOTION_FACIAL_UPLOAD_COMPLETED - User's motion capture finished uploading28MOTION_FACIAL_CONNECTION_ERROR - User was presented the "Motion connection error" screen during upload
Custom biometric token storage
When using the authentication with local storage solution, by default the SDK manages biometric token storage. The SDK also allows you to have control over the token lifecycle by exposing an API to override the default implementation to read and write the token, so it can be stored on-device, in the cloud, in a keychain or on your servers.
Implementation
You need to provide a class that conforms to the EncryptedBiometricTokenHandler protocol. Note the customerUserHash parameter in both functions that need to be implemented. This is a unique identifier for the user that can be used as a key for token storage. Feel free to ignore it if you have your own identifier.
Example of a class handling the callbacks for when a token is generated and for when we request a token from you:
1class CustomTokenHandlerClass: EncryptedBiometricTokenHandler {2 func onTokenGenerated(customerUserHash: String, encryptedBiometricToken: String) {3 // You store `customerUserHash` and `encryptedBiometricToken` however you choose to do so4 }56 func onTokenRequested(customerUserHash: String, completion: @escaping (String) -> Void) {7 // You use the `customerUserHash` to retrieve the encrypted biometric token you have stored and call `completion`, passing in this token8 }9}
Example of initialising a workflow with a class that handles tokens:
1let workflowConfiguration = WorkflowConfiguration(workflowRunId: "<WORKFLOW_RUN_ID>", sdkToken: "<YOUR_SDK_TOKEN>")2workflowConfiguration.withEncryptedBiometricTokenHandler(handler: self) // `self` to be replaced with a different instance if you are using a different class conforming to `EncryptedBiometricTokenHandler`
Migrating
You can find the migration guide at MIGRATION.md
Security
Certificate pinning
Note: Certificate pinning works only on devices running on iOS 10.3 or above.
You can pin any communications between our SDK and server through the .withCertificatePinning() method in
our OnfidoConfig.Builder configuration builder. This method accepts CertificatePinningConfiguration as a parameter,
with sha-256 hashes of the certificate's public keys.
For more information about the hashes, please email Onfido's Customer Support.
Swift
1let config = try OnfidoConfig.builder()2...3do {4 config.withCertificatePinning(try CertificatePinningConfiguration(hashes: ["<EXAMPLE_HASH>"]))5} catch {6 // handle CertificatePinningConfiguration initialisation failures. i.e Providing empty array causes initializer to be failed.7}8...9configBuilder.build()
Objective-C
1ONFlowConfigBuilder * builder =[ONFlowConfig builder];2...3NSError * error = NULL;4ONCertificatePinningConfiguration * pinningConf = [[ONCertificatePinningConfiguration alloc] initWithHashes: @[@"<EXAMPLE_HASH>"] error: &error]];5if (error != NULL) {6 // handle ONCertificatePinningConfiguration initialisation failures. i.e Providing empty array causes initializer to be failed.7}8[builder withCertificatePinningConfiguration: pinningConf];910...
Handling certificate pinning error
To identify a certificate pinning error, check the message property of the OnfidoFlowError.exception object. It will
return invalid_certificate for certificate pinning related errors.
1let responseHandler: (OnfidoResponse) -> Void = { response in2 switch response {3 case let .error(error):4 // Some error happened5 if case OnfidoFlowError.exception(withError: _, withMessage: let optionalMessage) = error, let message = optionalMessage {6 if message == "invalid_certificate" {7 // HANDLE INVALID CERTIFICATE CASE HERE8 }9 }10 case let .success(results):11 // User completed the flow12 // You can create your check here13 case .cancel:14 // Flow cancelled by the user15 }16}
Accessibility
The Onfido SDKs are WCAG 2.1 compliant to level AA. They have been optimized to provide the following accessibility support by default:
- Screen reader support: accessible labels for textual and non-textual elements available to aid VoiceOver navigation, including dynamic alerts
- Dynamic font size support: all elements scale automatically according to the device's font size setting
- Sufficient color contrast: default colors have been tested to meet the recommended level of contrast
- Sufficient touch target size: all interactive elements have been designed to meet the recommended touch target size
Refer to our accessibility statement for more details.
Licensing
Due to API design constraints, and to avoid possible conflicts during the integration, we bundle some of our 3rd party dependencies. For those, we include the licensing information inside our bundle and also in this repo under licenses folder, with the file named onfido_licenses.json. This file contains a summary of our bundled dependencies and all the licensing information required, including links to the relevant license texts contained in the same folder. Integrators of our library are then responsible for keeping this information along with their integrations.
Example on how to access the licenses:
1let onfidoBundle = Bundle(for: OnfidoFlow.self)2guard let licensesPath = onfidoBundle.path(forResource: "onfido_licenses", ofType: "json", inDirectory: nil),3 let licensesData = try? Data(contentsOf: URL(fileURLWithPath: licensesPath)),4 let licensesContent = String(data: licensesData, encoding: .utf8)5else {6 return7}89print(licensesContent)1011guard let mitLicensePath = onfidoBundle.path(forResource: "onfido_licenses_mit", ofType: "txt", inDirectory: nil),12 let mitLicenseData = try? Data(contentsOf: URL(fileURLWithPath: mitLicensePath)),13 let mitLicenseFileContents = String(data: mitLicenseData, encoding: .utf8)14else {15 return16}1718print(mitLicenseFileContents)
More Information
Sample App
We have included sample apps to show how to integrate with the Onfido iOS SDK using both Swift and Objective-C. See
the SampleApp and SampleAppObjC directories for more information.
Support
Should you encounter any technical issues during integration, please contact Onfido’s Customer Support team via email, including the word ISSUE: at the start of the subject line.
Alternatively, you can search the support documentation available via the customer experience portal, public.support.onfido.com.
We recommend you update your SDK to the latest version release as frequently as possible. Customers on newer versions of the Onfido SDK consistently see better performance across user onboarding and fraud mitigation, so we strongly advise keeping your SDK integration up-to-date.
You can review our full SDK versioning policy here.
Copyright 2025 Onfido, Ltd. All rights reserved.