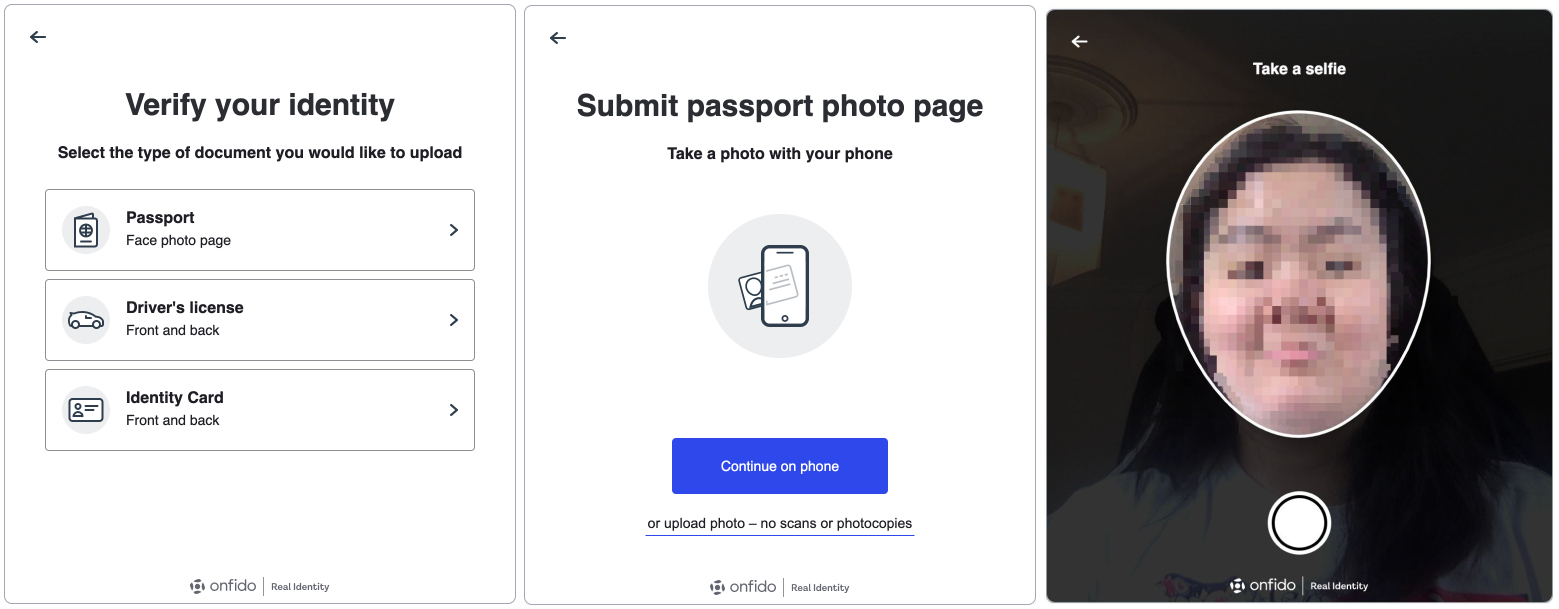
Onfido Smart Capture Web SDK


Overview
The Onfido Smart Capture SDKs provide a set of screens and functionality allowing applications to implement user identity verification flows. Each SDK contains:
- Carefully designed UX to guide your customers through the different photo or video capture processes
- Modular design to help you seamlessly integrate the different photo or video capture processes into your application's flow
- Advanced image quality detection technology to ensure the quality of the captured images meets the requirement of the Onfido identity verification process, guaranteeing the best success rate
- Direct image upload to the Onfido service, to simplify integration
- A suite of advanced fraud detection signals to protect against malicious users
All Onfido Smart Capture SDKs are orchestrated using Onfido Studio workflows with only minor customization differences between the available platforms.
The Onfido Web SDK is specifically designed for integrating web applications and easily managing cross-device experiences.
Environments and testing with the SDK
Two environments exist to support the Onfido SDK integrations:
- 'sandbox' - to be used for testing with sample documents
- 'live' - to be used only with real documents and in production apps
The environment being used is determined by the API token that is used to generate the necessary SDK token.
Going Live
Once you are satisfied with your integration and are ready to go live, please contact Onfido's Customer Support to obtain a live API token. You will have to replace the sandbox token in your code with the live token.
Check that you have entered correct billing details inside your Onfido Dashboard, before going live.
Importing the library & staying up-to-date
The Onfido Web SDK can be added to your project in two ways:
- Directly in the web application in a
scripttag or as animport - As part of your project build as a library imported from NPM
To benefit from the latest features and patches released by Onfido and minimize the size of the script used, it is highly recommended to use an integration method that leverages the Onfido CDN, as detailed in the following sections.
Note that while Onfido hosts the CDN and ensures the script availability at runtime, any project using the SDK library from NPM would require its hosting.
Direct CDN integration
The quickest and simplest way to integrate the Onfido Web SDK is to use the Onfido-hosted library.
From SDK 12.3.1 onwards, the version number you subscribe to can vary, depending on your needs:
- subscribing to a major release (e.g.
v14) means Onfido will update to the latest available patch and minor release - subscribing to a minor level release (e.g.
v14.11) means Onfido will update to the latest available patch release - subscribing to a specific patch release (e.g.
v14.11.0) will fix the library files to that SDK release
Importing the SDK in an html script tag
1<!-- Replace "<version>" with the actual SDK version you want to use, example: v14.11.0 -->2<script src="https://sdk.onfido.com/<version>" charset="utf-8"></script>
Note that prior to version 12.3.1, the CDN path was https://assets.onfido.com/web-sdk-releases/<version>/onfido.min.js.
Also note that from version 14 onwards, a separate stylesheet is no longer required as it will be included with the default library.
Importing the SDK with a JavaScript import directive
The library can also be invoked directly within an object or component:
1// ES6 module import2import { Onfido } from 'onfido-sdk-ui'34// commonjs style require5var Onfido = require('onfido-sdk-ui').Onfido
The CSS style will be included inline with the JS code when the library is imported.
Note: The library is Browser only, it does not support the Node Context.
Integrating with an NPM package
NPM is a public repository of libraries available for download and integration into web/native apps. Onfido has been publishing all its SDKs there for convenience to customers.
The Web SDK version 14 will continue with the existing package name:
1npm install onfido-sdk-ui
or
1yarn add onfido-sdk-ui
From version 14 onwards, the onfido-sdk-ui package will, by default, be connected to the Onfido CDN. In addition to the benefits of using a CDN and the library being directly in your build process, core functions will also be typed when used with Typesript.
From version 14 onwards, "split bundles" are no longer supported. Onfido recommends the use of either the direct or NPM CDN integration.
NPM package version pinning
In order to facilitate integration and A/B tests, the CDN-powered NPM package will also optionally support the ability to specify a version (major, minor or patch) of the Onfido Web SDK library.
NPM bundle is by default evergreen and subscribes to the latest major version of the SDK. More details are provided in the SDK version pinning section below.
TypeScript
Since version 6.5.0, TypeScript is officially supported.
Available types:
OnfidoApi- The base type for theOnfidoobjectSdkParameters- The parameters passed intoOnfido.init()
Initializing the SDK
⚠️ The following SDK initialization documentation applies to identity verification workflows orchestrated using Onfido Studio. For integrations where the verification steps are manually defined and configured, please refer to the Advanced flow customization section below.
The Web SDK has multiple initialization and customization options that provide flexibility to your integration, while remaining easy to integrate.
Note that from version 14, it will no longer be possible to change initialization options at runtime as was previously allowed with the setOption() function.
Defining a workflow
Onfido Studio is the platform used to create highly reusable identity verification workflows for use with the Onfido SDKs. For an introduction to working with workflows, please refer to our Getting Started guide, or the Onfido Studio product guide.
SDK sessions are orchestrated by a session-specific workflow_run_id, itself derived from a workflow_id, the unique identifier of a given workflow.
For details on how to generate a workflow_run_id, please refer to the POST /workflow_runs/ endpoint definition in the Onfido API reference.
Note that in the context of the SDK the
workflow_run_idproperty is referred to asworkflowRunId.
SDK authentication
The SDK is authenticated using SDK tokens. Onfido Studio generates and exposes SDK tokens in the workflow run payload returned by the API when a workflow run is created.
SDK tokens for Studio can only be used together with the specific workflow run they are generated for, and remain valid for a period of five weeks.
Note: You must never use API tokens in the frontend of your application as malicious users could discover them in your source code. You should only use them on your server.
Loading the Onfido flow
To load the Onfido flow, add an empty HTML element for the modal interface to mount itself on:
Note: Starting from Web SDK v14.0.0, the SDK container will automatically inherit 100% of the height and width of its parent wrapper. On desktop, it will be constrained by a maximum width of 600px and a maximum height of 800px.
If you are embedding the SDK within a div, iframe, or any other element, ensure that you adjust the dimensions of the parent container to meet your specific requirements.
1<div id="onfido-mount"></div>
With the configuration in an accompanying script:
1Onfido.init({2 token: '<YOUR_SDK_TOKEN>',3 containerId: 'onfido-mount',4 //containerEl: <div id="root" />, an ALTERNATIVE to `containerId`5 onComplete: function (data) {6 console.log('everything is complete')7 },8 workflowRunId: '<YOUR_WORKFLOW_RUN_ID>',9})
You can see an example integration of the Onfido Web SDK in our sample app.
You may also optionally specify a different container or identifier to load the Onfido flow:
-
containerId {String}- optionalID value of the container element that the UI will mount to. The element itself needs to be an empty element. The default ID is
onfido-mount. If your integration needs to pass the container element itself, usecontainerElas described next. -
containerEl {Element}- optionalContainer element that the UI will mount to. This needs to be an empty element. This can be used as an alternative to passing in the container ID string previously described for
containerId. Note that ifcontainerElis provided, thencontainerIdwill be ignored.
Integrating in a webview
While webviews provide a lightweight integration and simplify cross-platform development, they have limitations in terms of accessing device features such as the camera, microphone, and local files as they rely on the webview engines provided by the operating system. As such webviews don’t offer the same level of performance and user experience as the functionality of the Onfido mobile SDKs in native apps.
Where possible, Onfido recommends using its native mobile SDKs for optimal performance.
Please refer to this guide for more details about how to integrate the Onfido Web SDK in a webview.
Version pinning
NPM bundle is by default evergreen and subscribes to the latest major version of the SDK.
Based on the same major version, the minor and patch versions of the library can be specified in the Onfido.init() object.
-
version {String}- optionalThe specific version of the Onfido Web SDK that should be loaded as part of this initialization. A full version (e.g.
v14.12.1) or just a minor version (e.g.v14.13) can be specified. When a minor version is specified, the latest patch version for that minor release will be loaded. Example:version: "14.12.1"
Note: This parameter is only effective when the library is imported as npm bundle (as opposed to the default CDN-powered NPM package).
Styling customization
The Onfido Web SDK supports customization options to adjust the fonts, the SDK main container, buttons, links, icons, background color and popups.
The Web SDK also supports dark theme customization.
To customize the SDK, you can pass the required values to the theme object, in the root of the Onfido.init() object.
-
name {Object}- requiredThe theme's
nameobject allows for dark mode customization by setting the value tolightordark. -
config {Object}- optionalThe theme's
configobject caters for a range of optional CSS values for supported UI customization. The sample below lists all possible options with some example values:
1{2 "theme": {3 "name": "light", // or "dark",4 "config": {5 "borderRadiusButton": "56px",6 "borderStyleSurfaceModal": "0px",7 "fontWeightBody": 400,8 "fontSizeBody": "16px",9 "fontSizeSubtitle": "16px",10 "fontSizeTitle": "40px",11 "colorBackgroundSurfaceModal": "transparent",12 "colorBackgroundIcon": "transparent",13 "colorBorderLinkUnderline": "transparent",14 "colorBackgroundLinkActive": "transparent",15 "colorBackgroundLinkHover": "transparent",16 "colorBackgroundDocTypeButton": "transparent",17 "colorContentBody": "rgb(255,255,255)",18 "colorContentTitle": "rgb(255,255,255)",19 "colorContentSubtitle": "rgb(255,255,255)",2021 "colorContentButtonPrimaryText": "rgb(10,11,13)",22 "colorBackgroundButtonPrimary": "rgb(55, 115, 245)",23 "colorBackgroundButtonPrimaryHover": "rgb(55, 115, 245)",24 "colorBackgroundButtonPrimaryActive": "rgb(55, 115, 245)",2526 "colorContentButtonSecondaryText": "rgb(255,255,255)",27 "colorBackgroundButtonSecondary": "rgb(50,53,61)",28 "colorBackgroundButtonSecondaryHover": "rgb(30,32,37)",29 "colorBackgroundButtonSecondaryActive": "rgb(30,32,37)",30 "colorContentLinkTextHover": "rgb(55, 115, 245)",31 "colorBorderDocTypeButton": "rgb(20, 21, 25)",32 "colorBackgroundDocTypeButtonHover": "rgb(30,32,37)",33 "colorBackgroundDocTypeButtonActive": "rgb(30,32,37)",34 "colorContentDocTypeButton": "rgb(255,255,255)",35 "colorIcon": "rgb(55, 115, 245)",36 "colorContentInfoPill": "rgb(10,11,13)",37 "colorBackgroundInfoPill": "rgb(55, 115, 245)",38 "colorBackgroundSelector": "red",39 "colorBackgroundDropdownItemHover": "rgb(30,32,37)",40 "colorInputOutline": "rgb(87, 139, 250)",41 "colorContentButtonTertiaryText": "rgb(255,255,255)",42 "colorContentInput": "blue",43 "colorBackgroundInput": "green",44 "colorBorderInput": "yellow"45 }46 }47}
For use in a webview on a mobile device, it is recommended to set up the SDK to use the full screen of the device. Otherwise, there may not be enough room to display all critical elements of the SDK.
Note that from version 14, the Onfido SDK options to load the screens in a modal have been deprecated. If you wish to load the Onfido screens in a modal you will have to define it as part of your own integration.
Co-branding
The Onfido SDK allows for two co-branding options that affect the display of the Onfido logo at the bottom of the Onfido screens.
For further customization, please contact your Onfido Solution Engineer or Customer Success Manager.
Text co-branding
-
cobrand {Object}- optionalThe most effective way to add your brand to the footer watermark, is by use of the
cobrandproperty underenterpriseFeatures. This property takes atextparameter.
1Onfido.init({2 ...3 enterpriseFeatures: {4 cobrand: {5 text: "Onboarding, Inc."6 }7 },8})
Logo co-branding
-
logoCobrand {Object}- optionalAs an alternative to
cobrand, you may specify a set of images to be defined in thelogoCobrandproperty underenterpriseFeatures. You must provide the path to an image for use in 'dark' mode and a separate image for 'light' mode. Both images must have a resolution of 144x32.
1Onfido.init({2 ...3 enterpriseFeatures: {4 logoCobrand: {5 darkLogoSrc: "https://YourLogoImageUrlOrFilePath",6 lightLogoSrc: "https://YourLogoImageUrlOrFilePath",7 }8 },9})
Language, translations and custom text
The Onfido SDKs support translations for over 40 languages, as well as the ability to integrate custom text and languages.
Defining a default language and applying custom translations or text is done with the language and translations properties at the root of the Onfido.init() call.
Language selection
-
language {String}- optionalYou can specify the language displayed during the SDK session. The
stringidentifier can either be one of Onfido's supported languages (full list available in the SDK customization guide) or your own custom language identifier as described in the Using custom language files section below.
1Onfido.init({2 ...3 language: 'pt_BR'4})
If the language property is not present, the language identifier is incorrect or not yet supported by Onfido, the SDK will use the browser's language setting.
If the browser's language is not supported by Onfido, the SDK will default to English (en_US).
Note: In the context of cross-device and OTP, the language of the SMS body is also controlled by this identifier.
Custom translations and text
In addition to selecting a default language for the SDK session, the SDK can also be initialised with custom text and translations for each required language.
-
translations {Object}- optionalYou can specify custom text and translations by overriding individual text strings for all languages required by your implementation. The structure of each language file, including all available keys, is described in the next section.
1Onfido.init({2 ...3 translations: {4 en_US: {5 welcome: {6 title: 'This custom title will appear by default for en_US'7 }8 },9 es: {10 welcome: {11 title: 'Este título personalizado aparecerá por defecto para es'.12 }13 }14 }15})
Identifying language keys
The full list of keys that can be customized in the Onfido Web SDK is available on the Onfido CDN and is split by module and language.
Note that the same keys are available across all supported languages and are accessible by specifying the appropriate language name in the URL (en_US.json in the example above).
It is also possible to identify text that can be customized by using a browser inspector and indentifying div blocks with the attribute name data-i18n-token.

Using custom language files
The Onfido Web SDK allows the use of custom languages alongside all officially supported languages. This functionality is achieved by:
- defining a unique
languageidentifier - using the unique
languageidentifier within thetranslationsobject, mapping any required strings to the existing language file structure
1Onfido.init({2 ...3 language: 'MY_CUSTOM_LANG',4 translations: {5 MY_CUSTOM_LANG: {6 welcome: {7 title: 'This custom title will appear by default'8 }9 }10 }11})
Note: Custom languages, similarly to standard text overrides, work as 'delta' to the base language file they relate to. In the case of custom languages, that base language is en_US.
Cross-device navigation
The Web SDK offers a cross-device flow where desktop users are directed to continue on their mobile device browser to complete the capture process. This provides a vastly improved image quality versus a typical desktop webcam and increases the likelihood of successful live capture.
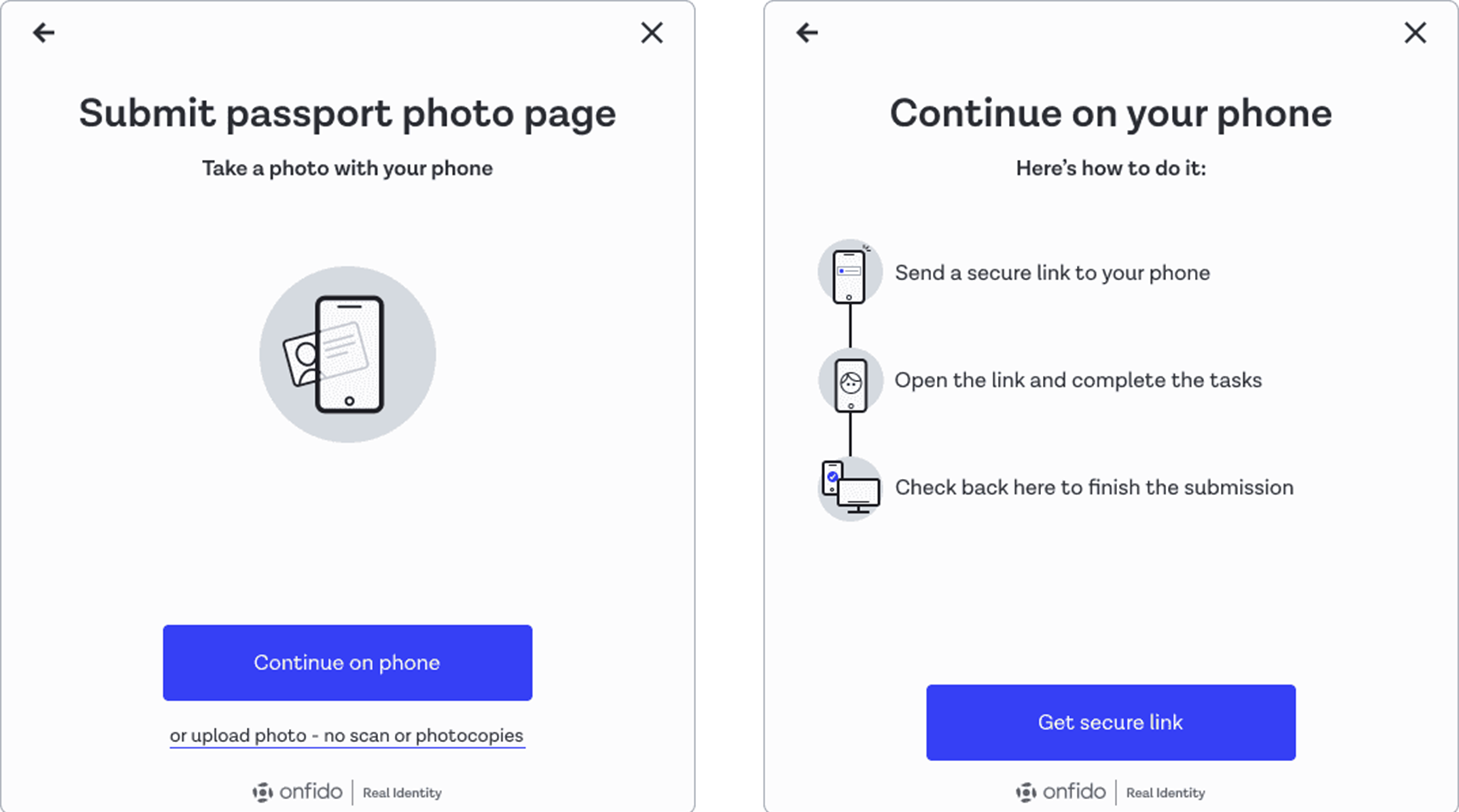
Three options are offered to the user to resume the flow on a mobile device browser:
- QR code that can be scanned with a camera app (default)
- 'Copy Link' feature that can be copy/pasted into a web browser
- One-time SMS link that can be sent directly to the user's mobile phone
Regardless of the cross-device method, the secure URL is unique to this session.
At the end of the capture process, users will be instructed to revert back to their desktop to complete the SDK flow.
Note that during a capture sequence on a desktop device, if a camera cannot be detected, the user is forwarded directly to the cross-device flow in order to attempt the capture on another device.
Also note that One-Time SMS links cannot be sent to the following regions and the messages will not be delivered:
North America
- Cuba
- Haiti
Asia
- Afghanistan
- Bhutan
- East Timor
- Iran
- Iraq
- Democratic People's Republic of Korea
- Laos
- Lebanon
- Myanmar
- Palestinian Territory
- Syria
- Tajikistan
- Yemen
Africa
- Burkina Faso
- Burundi
- Cape Verde
- Central Africa
- Chad
- Comoros
- Djibouti
- Equatorial Guinea
- Eritrea
- Guinea Bissau
- Liberia
- Libya
- Madagascar
- Mauritania
- Niger
- Somalia
- South Sudan
- Sudan
- Zimbabwe
For more information regarding region blocking, please contact Onfido's Customer Support.
Enforcing cross-device navigation
In order to optimize the capture quality, it is recommended to enforce the cross-device flow. The option is available in Onfido Studio, configurable in the workflow builder.
Cross-device can also be enforced at run-time using the following initialization option:
-
crossDevicePolicy {String}- optionalBy default, the cross-device flow is not enforced but shown to the user alongside a button to upload a document instead. You can force the user to capture a document or face on a mobile device by either:
-
setting the option globally (across all workflow runs) in the workflow builder
-
setting the
crossDevicePolicyinitialization option at runtime to eitherforceordisableto completely remove the optionjavascript1crossDevicePolicy: 'force'
Customizing the cross-device experience
In addition to forcing the cross-device flow, the cross-device experience can be further customized during the SDK initialization with the following options:
-
_crossDeviceLinkMethods {List<String>}- optionalYou can specify which of the three cross-device link options are presented to the user by adding any of
qr_code,copy_linkand/orsmsto the_crossDeviceLinkMethodsusing a,as a separator. The first element of the list will be the default option shown to the user. Note the underscore at the start of the string.javascript1_crossDeviceLinkMethods: ['qr_code', 'copy_link', 'sms'] -
smsNumberCountryCode {String}- optionalYou can change the default country for the SMS number input by passing the
smsNumberCountryCodeoption at the root of theOnfido.init()call when the SDK is initialized. The value should be a string containing a 2-character ISO country code. If empty, the SMS number country code will default toGB.javascript1smsNumberCountryCode: 'US' -
userDetails {Object}- optionalThe following user details can be specified ahead of time, so that the user doesn't need to provide the information themselves:
smsNumber(optional) : The user's mobile number can be added to the optionaluserDetailsobject at the root of theOnfido.init()call. The value should be a string containing the mobile number with a country code.
javascript1userDetails: {2 smsNumber: '+447500123456'3} -
crossDeviceClientIntroProductLogoSrc {String}- optionalYou can customize the icon by adding your company or product logo to be displayed instead of the default SDK icon image with this option. The image referenced in the path should be no more than 144px in both height and width.
javascript1Onfido.init({2 ...3 crossDeviceClientIntroProductLogoSrc: "path://to/logo/image/file",4});
Note that from version 14, the crossDeviceClientIntroProductName option used in previous versions to modify just the customer name in the cross-device intro screen has been deprecated. Instead, you should use the standard language customization process to override the subtitle of the screen.
Cross-device experience: beta features
In an effort to provide more flexibility and security to the cross-device experience, new features are gradually being introduced in the main user flow. The capabilities listed below are available to all integrations using the Web SDK version 14.44 and above. For more information and activation, please contact Customer Support or your Customer Success Manager.
| Beta feature | |
|---|---|
| Dynamic cross-device QR code When enabled, the QR code displayed in the source (desktop) session will automatically refresh every 10 seconds. This feature cannot currently be used with other link methods. | |
| User connection confirmation screen When enabled, this new screen would appear as the first screen on the end-user's mobile device. It displays metadata relating to the source (desktop) session as well as guidance and an opportunity to drop out of the cross-device flow. | 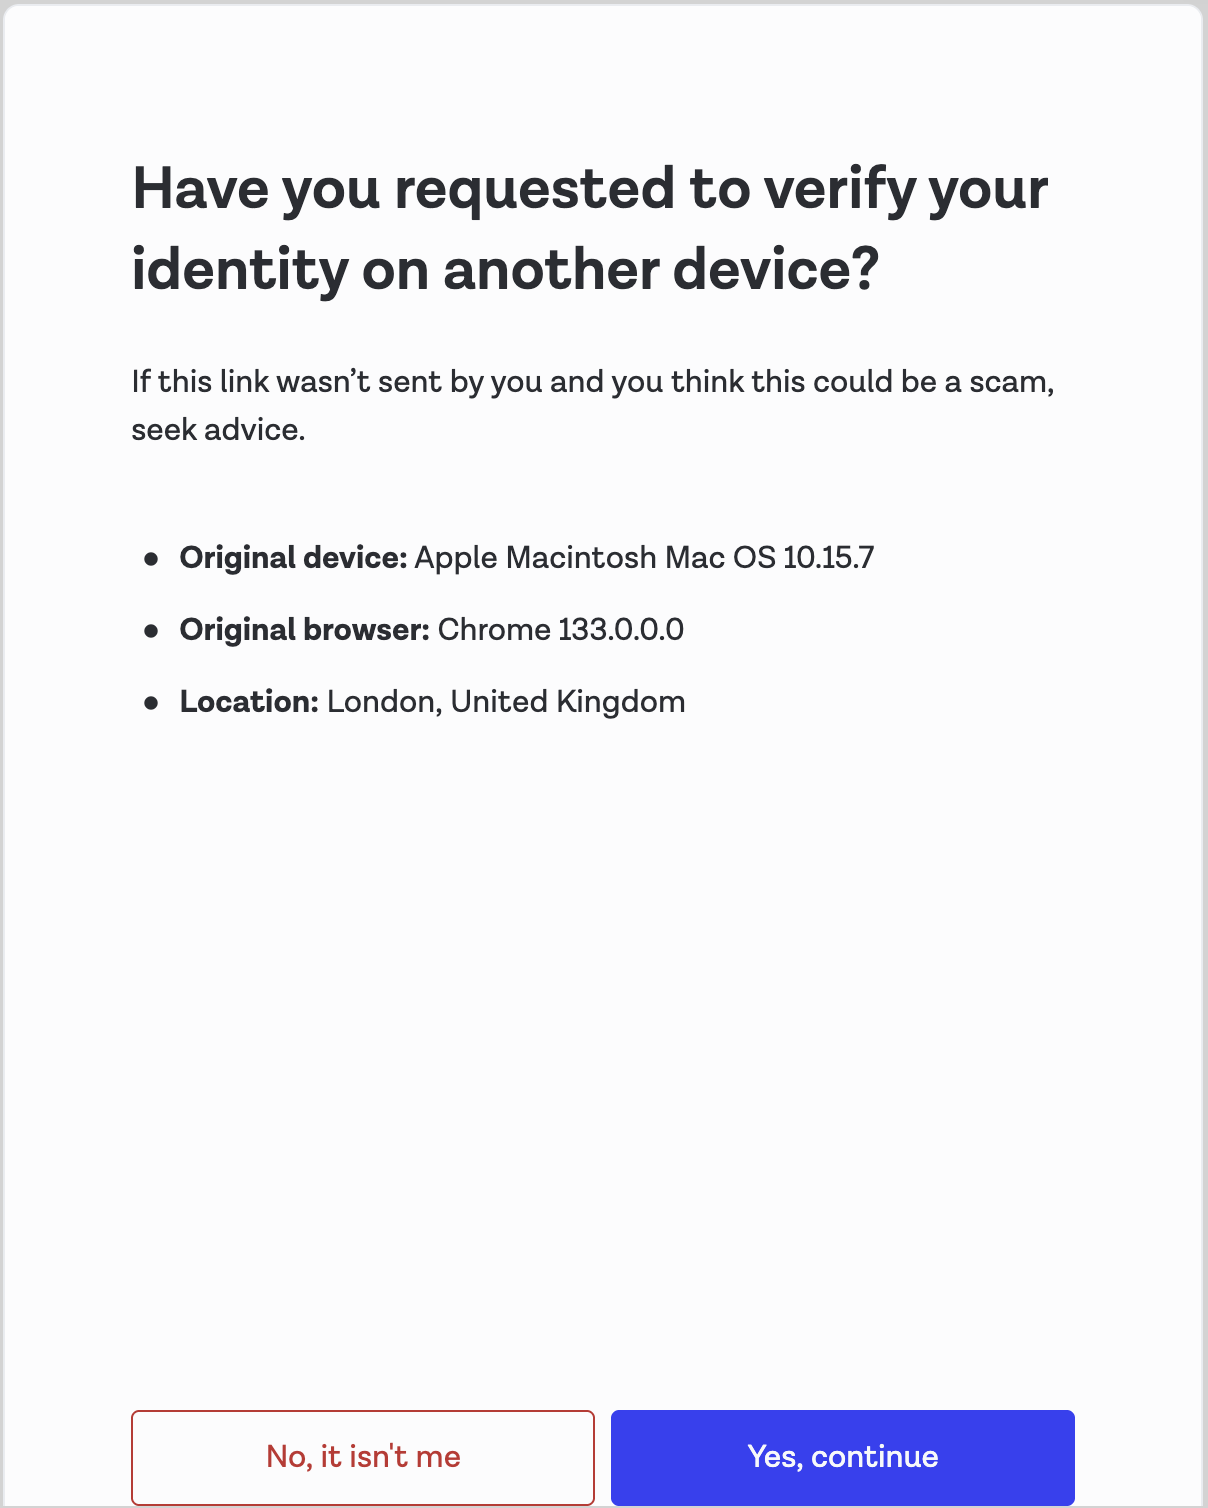 |
| User verification screen This screen is provided independently of (and would appear after) the aforementioned cross-device confirmation screen. When enabled, the mobile screen would request the end-user to select the confirmation code that appears on the initiating source (desktop) screen. Incorrect entry results in the cancellation of the flow. | 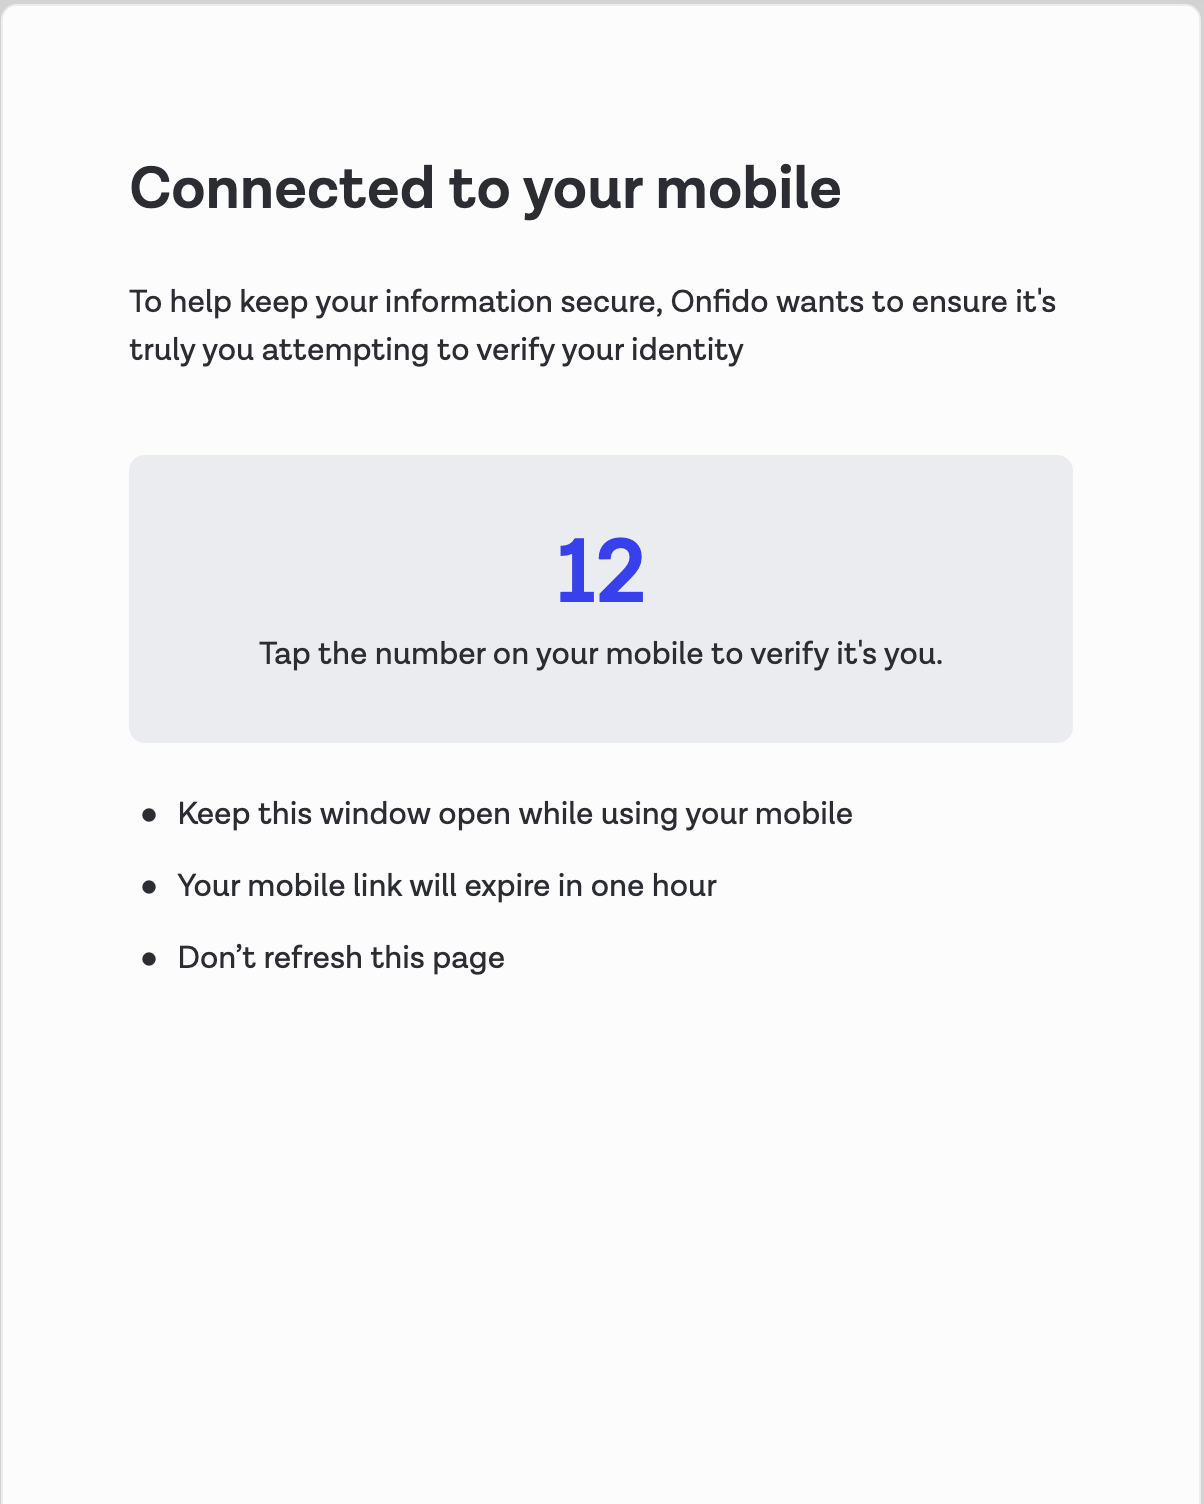 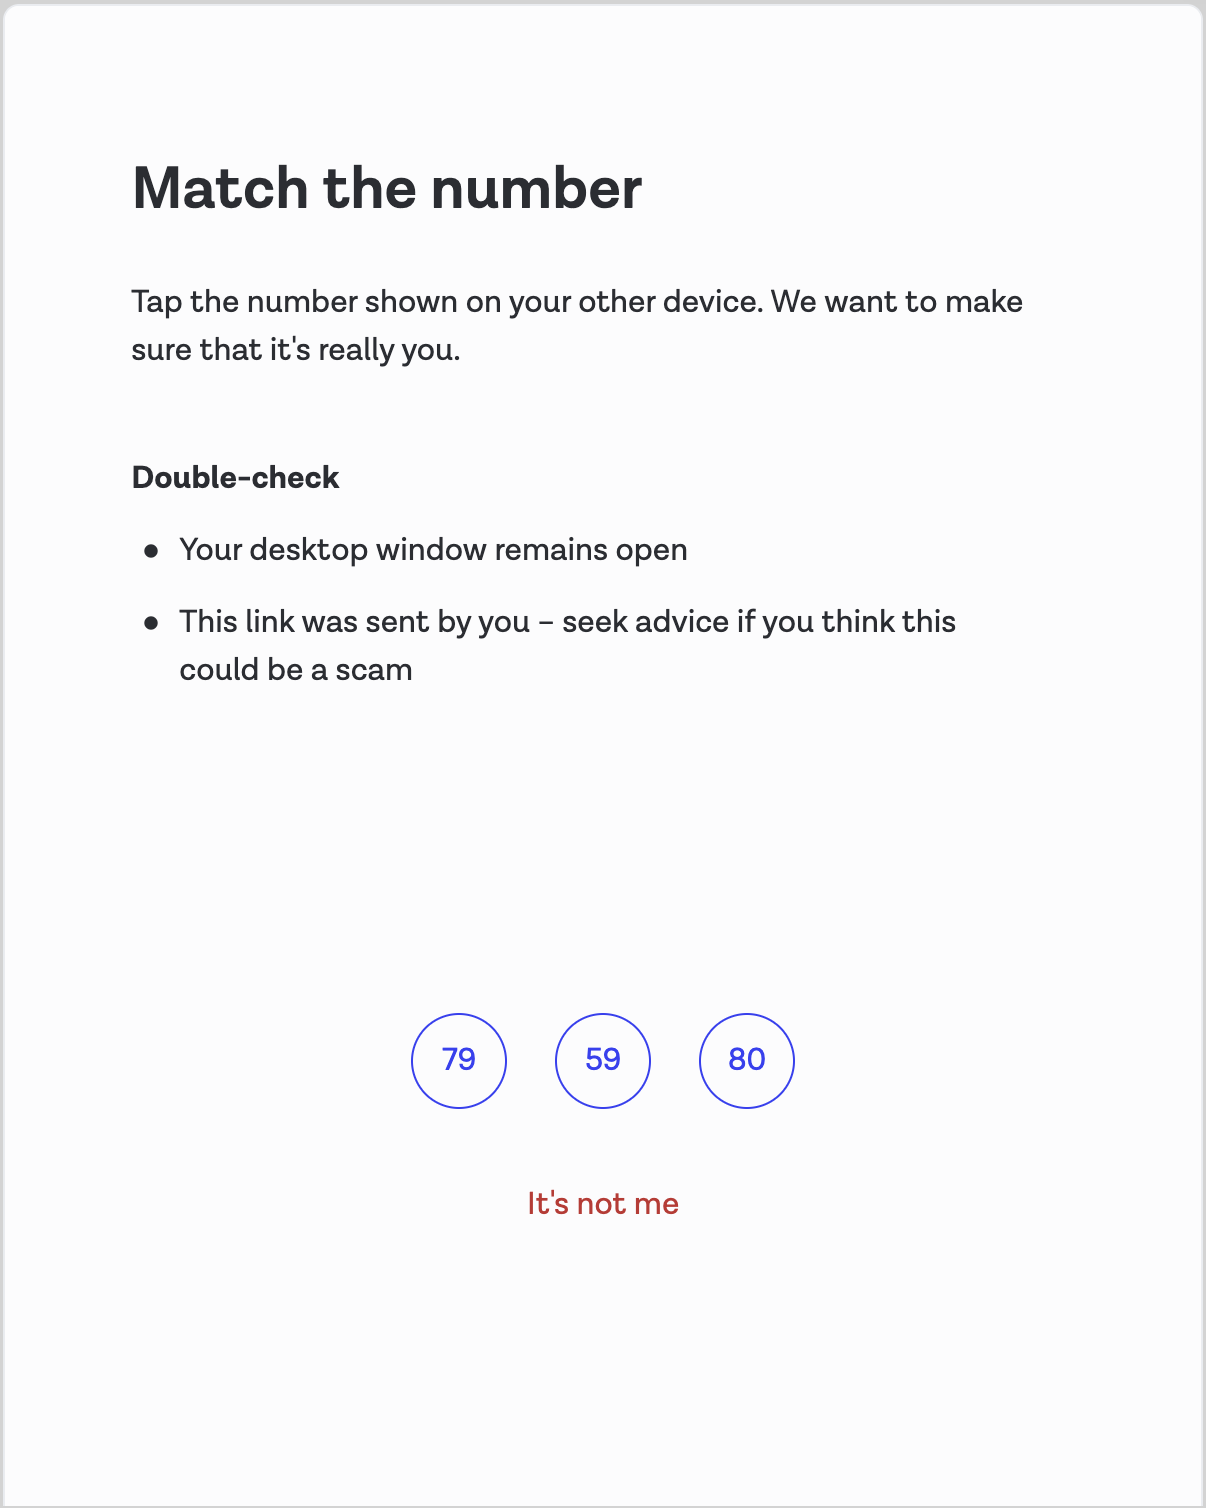 |
Completing a session
Handling callbacks
When the Onfido SDK session will conclude, one of two callback functions may be triggered:
onComplete: the session was successfulonError: the session terminated unexpectedlyonUserExit(Beta): the session terminated by end user
For advanced callbacks used for user analytics and returning submitted media, please refer to the Advanced Callbacks section of this document.
onComplete {Function} - optional
Callback that fires when all the capture tasks of a workflow have successfully been executed.
1Onfido.init({2 token: "<YOUR_SDK_TOKEN>",3 ...4 onComplete: function(data) {5 console.log("everything is complete");6 },7 onError: function(error) {8 console.log("an error occurred");9 }10});
After onComplete has fired in the context of a workflow, information about the files uploaded by the user during the session can be retrieved via the dedicated Document, Selfie and Video API endpoints.
While the existing implementation of onComplete also returns partial information after a workflow has been executed, this behaviour will be removed in the next major version of the web SDK.
Note: For implementation not relying on workflows, please refer to the Manual onComplete callback section of this guide for more details about the payload content.
onError {Function} - optional
Callback that fires when an error occurs. The callback returns the following error types:
-
invalid_tokenThis error will be returned when the SDK token is invalid or missing.javascript1{2 type: "invalid_token",3 message: "The token is invalid."4} -
expired_tokenThis error will be returned when a token has expired. This error type can be used to provide a new token at runtime.javascript1{2 type: "expired_token",3 message: "The token has expired, please request a new one"4} -
expired_trialThis error will be returned when the trial has expired.javascript1{2 type: "expired_trial",3 message: "The trial period is expired."4} -
geoblocked_requestThis error will be returned when the request is geo-blocked.javascript1{2 type: "geoblocked_request",3 message: "The request is not allowed from this location."4} -
permissions_unavailableThis error will be returned if the SDK was unable to access or request the necessary permissions. This may occur when the Web SDK is loaded within a webview or other custom browsers.javascript1{2 type: "permissions_unavailable",3 message: "Unable to retrieve or access required user permissions"4} -
unsupportedThis error will be returned when the a module is not supported in the current environment.javascript1{2 type: "unsupported",3 message: "The module is not supported in the current environment."4} -
unsupported_featureThis error will be returned when a feature is not supported.javascript1{2 type: "unsupported_feature",3 message: "The feature is no longer supported."4} -
invalid_sdk_parameterThis error will be returned when the SDK is initialized with invalid parameters.javascript1{2 type: "invalid_sdk_parameter",3 message: "The SDK is initialized with invalid parameters."4} -
unsupported_sdk_versionThis error will be returned when the workflow is not supported by the SDK version.javascript1{2 type: "unsupported_sdk_version",3 message: "The SDK version is not compatible with the workflow."4} -
no_cameraThis error will be returned when the camera is not available and no other capture method is available.javascript1{2 type: "no_camera",3 message: "The camera is not available."4} -
user_consent_deniedThis error will be returned when the user exits the flow because they declined the consent.javascript1{2type: "user_consent_denied",3message: "The user has declined the consent."4} -
exceptionThis will be returned for all unknown errors, including:- timeout and server errors
- unexpected javascript errors
This data can be used for debugging purposes.
javascript1{2 type: "exception",3 message: "The request could not be understood by the server, please check your request is correctly formatted"4 exception: Error5}workflow_abandonedThis error will be returned when the user has abandoned the workflow run and it has timed out.
javascript1{2 type: "workflow_abandoned",3 message: "The workflow has been abondoned."4}workflow_errorThis error will be returned when there is an error with workflow run.
javascript1{2 type: "workflow_error",3 message: "The workflow run is invalid."4}
onUserExit {userAction}(Beta) - optional
Callback that fires when the exit button is pressed or consent is denied by the end user.
The userAction parameter returns one possible value:
user_exit- the user pressed the exit button
The showExitButton(Beta) property (which defaults to false) is used for displaying the exit button in the Web SDK.
1Onfido.init({2 // ...other properties3 showExitButton: true / false4 onUserExit: (userAction) => {5 console.log('Exit the SDK', userAction);6 },7 // ...other properties8})
SDK tear-down
If you have embedded the SDK inside a single page app, you can call the tearDown function to remove the SDK completely from the current webpage. It will reset the state and you can safely re-initialize the SDK inside the same webpage later on.
1onfidoOut = Onfido.init({...})2...3await onfidoOut.tearDown()
⚠️ Warning: The tearDown method is a Promise. If you plan on mounting the SDK a second (or nth) time, please await the promise first.
1onfidoOut = Onfido.init({...})2await onfidoOut.tearDown()3onfidoOut2 = Onfido.init({...})
Generating verification reports
While the SDK is responsible for capturing and uploading the user's media and data, identity verification reports themselves are generated based on workflows created using Onfido Studio.
For a step-by-step walkthrough of creating an identity verification using Onfido Studio and our SDKs, please refer to our Quick Start Guide.
If your application initializes the Onfido Web SDK using the options defined in the Advanced customization section of this document, you may create checks and retrieve report results manually using the Onfido API. You may also configure webhooks to be notified asynchronously when the report results have been generated.
Advanced flow customization
This section on 'Advanced customization' refers to the process of initializing the Onfido Web SDK without the use of Onfido Studio. This process requires a manual definition of the verification steps and their configuration.
The steps parameter is mutually exclusive with workflowRunId. The other parameters under Onfido.init() remain the same.
Note that this initialization process is not recommended as the majority of new features are exclusively released for Studio workflows.
Manual SDK authentication
The SDK is authenticated using SDK tokens. As each SDK token must be specific to a given applicant and session, a new token must be generated each time you initialize the Onfido Web SDK.
-
token {String}- requiredA JWT is required in order to authorize with the Onfido WebSocket endpoint. If the SDK token is missing, an exception will be thrown.
For details on how to manually generate SDK tokens, please refer to the POST /sdk_token/ definition in the Onfido API reference.
It's important to note that manually generated SDK tokens expire after 90 minutes (SDK tokens generated in Onfido Studio when creating workflow runs are not affected by this limit).
Note: You must never use API tokens in the frontend of your application as malicious users could discover them in your source code. You should only use them on your server.
-
steps {List<String>}- optionalThe list of user verification steps, in order of appearance. Each step can either be specified as a string (when no customization is required) or an object (when customization is required). Customization options are described in the following sections.
From the possible steps listed below, only document is required:
| Step | Description |
|---|---|
welcome | Welcome screen shown to the user with preliminary instructions. Customization options include modification to the text elements and instructions shown to the user. |
document | Set of screens that control the capture via photo or upload of the user's document. Numerous customization options are available to define the document list presented to the user and the overall capture experience. |
face | Set of screens that control the capture of a selfie, video or motion of the user. The customization options allow the selection of the capture variant as well as fallback options. |
poa | Set of screens where the user selects the issuing country and type of document to verify their address. |
complete | Screen shown to the user at the end of the flow. Customization options include modifications to the text elements shown to the user. |
1Onfido.init({2 token: "<YOUR_SDK_TOKEN>",3 ...4 steps: [5 {6 type: "welcome",7 options: {8 title: "Open your new bank account",9 },10 },11 "document",12 "poa",13 "face",14 ];15});
welcome step
This step is the introduction screen of the SDK. It introduces the process and prepares the user for the steps they will need to complete. These steps can be specified to match the flow required.
While this screen is optional, we only recommend its removal if you already have your own identity verification welcome screen in place.
The custom options are:
title(string)descriptions([string])nextButton(string)
document step
The Document Capture step is typically organised in three parts:
- The issuing country and document type selection
- The camera capture
- The document review and upload
Note that the document step is mandatory.
The customization options available all relate to the country and document type selection screen. By default, the selection screen is shown with the country selection being empty.
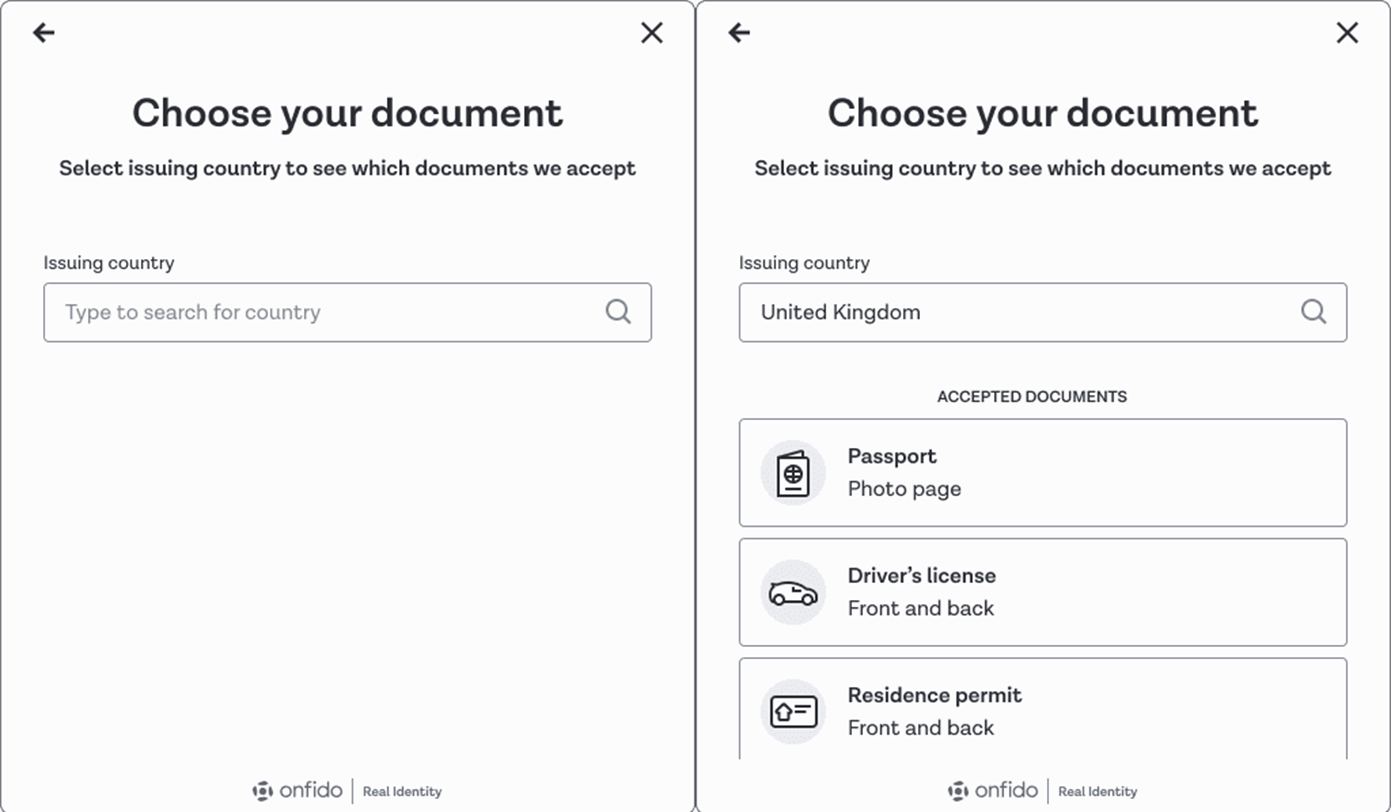 The above images are for web SDK versions 8.3.0+
Depending on the customization options defined in this step or the 'allowed countries' defined in your Dashboard, either the country or document type selection screens might not be shown:
- The country selection screen will not be shown if only 1 country is selected or if only passports are allowed
- The document selection screen will not be shown if only 1 document type is specified
You can specify allowed issuing countries and document types for the document capture step in one of three ways:
-
Onfido Studio: If you are using Onfido Studio, this is configured within the Document Capture task, as documented in the Studio Product Guide
-
Dashboard : Otherwise, the recommended approach is to apply this configuration globally in the Dashboard under Accounts \ Supported Documents. This option also ensures that the list is enforced as part of the Document Report validation. Any document that has been uploaded by an end user against your guidance will result in a Document Report sub-result of "rejected" and be flagged as
Image Integrity>Supported Document.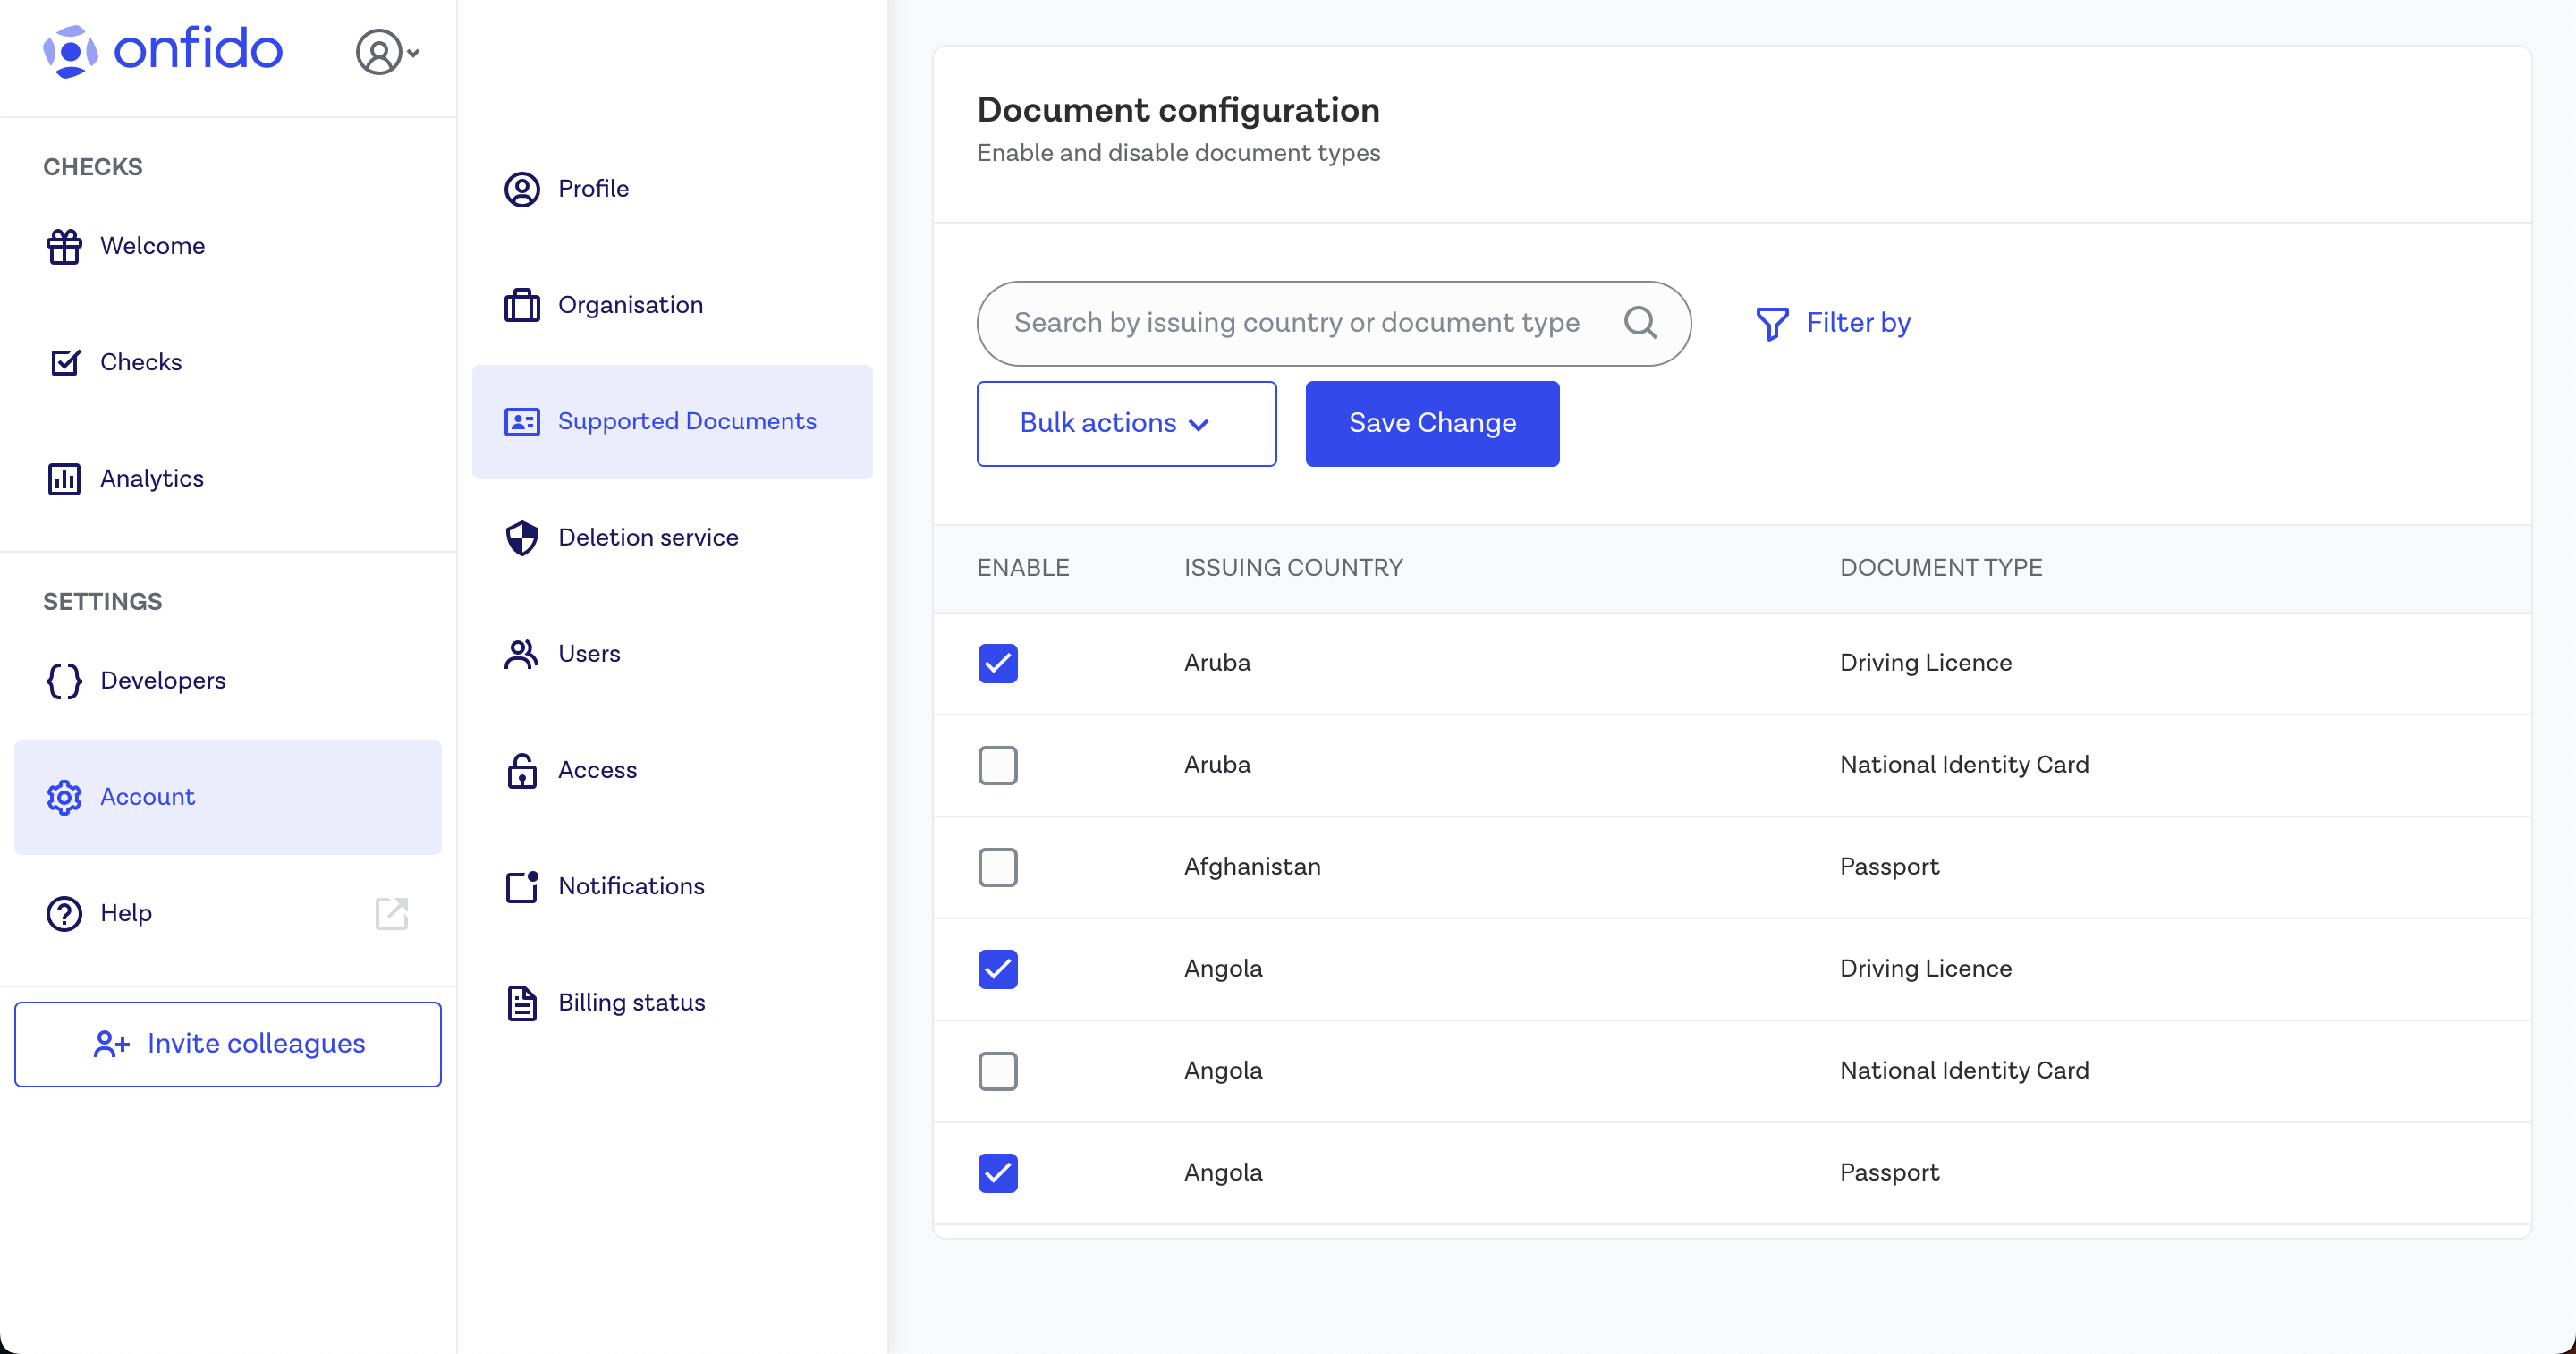
-
Run-time: For run-time configuration, the following
optionscan be defined under thedocumentstep:-
documentTypes {Object}- requiredThe list of document types visible to the user can be filtered by using the
documentTypesoption. WhendocumentTypesis not defined, the default value for each document type istrue. WhendocumentTypesis defined, it will override the default values. Absent types are consideredfalse. -
country {String}- optionalDocument country can be specified per document type. The
countryconfiguration for a document type allows you to specify the issuing country of the document as a string containing a 3-letter ISO 3166-1 alpha-3 country code.If
documentTypesonly includes one document type with a country value, users will not see the document selection screen and instead will be taken directly to the capture screen.⚠️ Note: the
nullvalue is deprecated and has no effect.⚠️ Note: Passports have the same format worldwide so the SDK will not show the country selection screen even if they are not restricted by country (e.g. passport: true).
-
hideCountrySelection {Boolean}- optionalIt is possible to completely remove the country selection screen, showing instead the list of all possible document types directly to the user by setting
hideCountrySelectiontotrue. This is not recommended as it will prevent document-specific optimization of the flow and detailed analytics.
-
1{2 "steps": [3 "welcome",4 {5 "type": "document",6 "options": {7 "documentTypes": {8 "driving_licence": {9 "country": "ESP"10 },11 "national_identity_card": true,12 "residence_permit": true13 }14 }15 },16 "complete"17 ]18}
In the example above only Spanish (ESP) driving licences, and national identity cards and residence permits for all countries will be shown
Please note:
- Hard coding any document type and issuing country configuration in your SDK integration will fully override the Dashboard-based settings
- Currently, only passport, national ID card, driving licence and residence permit are visible for document selection by the end user in the SDK. If you nominate other document types in your Dashboard (visa, for example), these will not be displayed in the user interface
- If you need to add other document types to the document selection screen, you can mitigate this limitation in the near-term, using the Custom Document feature
- If for any reason the configuration fails or is not enabled, the SDK will fallback to displaying the selection screen for the complete list of documents supported within the selection screens
Custom Documents
In case you require to capture a document that is not supported by Onfido or a supported document with a different name or scope (e.g. capturing the back of a two-sided document, even if it is not required for verification purposes), custom documents can be manually defined.
Note that if recognized, Onfido will still attempt to process them based on their detected classification.
-
genericDocumentTypes {Object}- optionalIf defined under the
documentstepoptions, the custom document will be displayed at the bottom of the standard document types list after any other document types applicable to the other optional country / document type selection options defined in the previous sections.javascript1genericDocumentTypes: [2 {3 id: 'my_single_side_document',4 title: 'My single side document',5 subTitle: 'Details about my document',6 country: 'ALB',7 pages: 1,8 },9 {10 id: 'my_two_sides_document',11 title: 'My two sides document',12 subTitle: 'Details about my document',13 country: 'ALB',14 pages: 2,15 },16]In the same way to other document types, if you wish to skip the document selection screen, you can add a single
generic_documentobject which references the custom document declared ingenericDocumentTypes.javascript1documentTypes: {2 generic_document: {3 id: 'my_single_side_document',4 }5}
poa step
This is the Proof of Address capture step. Users will be asked to select the issuing country of their document, the document type, and to provide images of their selected document. They will also have a chance to check the quality of the images before confirming.
poa flow options
The poa step can be customised to allow users to select specific documents from either one or multiple countries using the following attributes:
-
documentTypes {Object}- requiredThe
documentTypesobject defines which documents users can upload as proof of address, and optionally which country each document type is associated with. If only one document type is specified, the document selection screen is skipped, and users go straight to the document upload screen. -
country {String}- requiredThe
countryobject is used to specify the issuing country per document type, using a 3-letter ISO 3166-1 alpha-3 country code.
In the example below, only Spanish bank and building society statements will be shown:
1{2"steps": [3 "welcome",4 {5 "type": "poa",6 "options": {7 "documentTypes": {8 "bank_building_society_statement": {9 "country": "ESP"10 }11 }12 }13 },14 "complete"15]16}
In the example below, only Spanish bank and building society statements, plus address certificate and utility bill for all countries will be shown:
1{2 "steps": [3 "welcome",4 {5 "type": "poa",6 "options": {7 "documentTypes": {8 "bank_building_society_statement": {9 "country": "ESP"10 },11 "address_certificate": true,12 "utility_bill": true13 }14 }15 },16 "complete"17 ]18}
face step
This is the face capture step. Users will be asked to capture their face in the form of a photo, a video, or a motion capture. For photos and videos, they will also have a chance to check its quality before confirming.
Note that if a camera can’t be detected, the user will be forwarded to the cross-device flow in order to attempt to capture on another device. The cross-device flow will be presented to the user, before any optional fallback variants are assessed by the Web SDK.
face flow options
-
requestedVariant {String}- optionalA preferred variant can be requested for this step, by passing the option
requestedVariant: 'standard' | 'video' | 'motion', with the default version beingstandard. IfrequestedVariantis:standard: a photo will be capturedvideo: a video will be capturedmotion: a motion capture will be captured
json1{2 "steps": [3 "welcome",4 "document",5 {6 "type": "face",7 "options": {8 "requestedVariant": "motion"9 }10 },11 "complete"12 ]13} -
showIntro {Boolean}- optionalThe instruction screen shown to the user at the beginning of the
facecapture step can be skipped for all variants. By default, the screen is shown (default totrue). When disabled for thestandardandmotionvariant, the entire intro screen will be removed from the flow. When disabled for thevideovariant, the example video will be hidden in the intro screen, only showing the text instructions. -
useMultipleSelfieCapture {Boolean}- optionalThis option only applies to the variant
standard. By default the SDK will take additional selfie snapshots to help improve face similarity check accuracy. When disabled, only one selfie photo will be taken. -
recordMotionAudio {Boolean}- optionalThis option only applies to the variant
motionand enables the recording of the user's background audio. By default this is option is set tofalse. If a user does not opt into granting microphone permissions, they cannot proceed with the Motion flow, and no video can be created or uploaded.
face fallback options
The SDK will try to fulfil the request depending on camera availability, device capabilities and browser support on the user's device:
- if the selected variant cannot be fulfilled and the user is on a desktop, the user will first be forwarded to the cross-device screen. This default step is introduced with version 14 of the Web SDK.
- if a video cannot be taken on the mobile device, the face step can be configured to fallback to the
standardvariant (seephotoCaptureFallback) - if Motion cannot be captured on the mobile device, an
unsupportederror will be thrown, which can be handled byonError().
If the SDK is initialized with the requestedVariant option for the face step, make sure you use the data returned in the onComplete callback to request the correct report when creating a check.
-
photoCaptureFallback {Boolean}- optionalThis feature only applies to the video variant. By default, this option is
trueand allows end-users to capture a selfie if their mobile browser does not support MediaRecorder (which is required by the other variants). When disabled, we will return an unsupported browser error if the end-user browser doesn’t support MediaRecorder.
complete step
This is the final completion step. The screen displays a completion message to signal the next steps to the user. This is an optional screen. The custom options are:
message(string)submessage(string)
Advanced callbacks
Manual onComplete callback
In the context of non-workflow sessions, the onComplete callback returns additional information about the files uploaded by the user via the Onfido capture modules.
1Onfido.init({2 token: "<YOUR_SDK_TOKEN>",3 ...4 onComplete: function (data) {5 console.log("everything is complete");6 },7});
The data object contains properties of the documents and face images uploaded by the user during the SDK session. The properties contain a unique identifier that can be used to retrieve the full document or face capture using the corresponding document, live_photos (for 'standard' selfies) or live_videos (for 'video' or 'motion' captures) endpoints defined in the API reference.
1{2 "document": {3 "type": "driving_licence",4 "sides": {5 "front": {6 "id": "<DOCUMENT_ID_FRONT>"7 },8 "back": {9 "id": "<DOCUMENT_ID_BACK>"10 },11 "front_video": {12 "id": "<DOCUMENT_ID_FRONT_VIDEO>"13 },14 "back_video": {15 "id": "<DOCUMENT_ID_BACK_VIDEO>"16 }17 }18 },19 "face": {20 "id": "<FACE_ID>",21 "variant": "standard"22 },23 "poa": {24 "type": "utility_bill",25 "sides": {26 "front": {27 "id": "<POA_DOCUMENT_ID_FRONT>"28 },29 "back": {30 "id": "<POA_DOCUMENT_ID_BACK>"31 },32 "front_video": {33 "id": "<POA_DOCUMENT_ID_FRONT_VIDEO>"34 },35 "back_video": {36 "id": "<POA_DOCUMENT_ID_BACK_VIDEO>"37 }38 }39 }40}
For the document step, two-sided documents such as driving_licence and national_identity_card, the object will also contain a document_back property representing the reverse side.
For the face step, an object is returned with the variant used for the face capture,'standard' | 'video' | 'motion'.
For the poa step:
backis only returned for two-sided documents- the
_videovariants are defined for consistency but are not currently in use.videoand standard variants are mutually exclusive.
Custom media callbacks
The following features must be enabled for your account before they can be used. For more information, please contact your Onfido Solution Engineer or Customer Success Manager.
Custom media callbacks enable you to control the data collected by the Onfido SDK by using callbacks that are invoked when the end user submits their captured media. The callbacks provide all of the information that would normally be sent directly to the Onfido API and expect a promise in response, that controls what the SDK does next.
Once custom media callbacks are enabled for your account, you will need to add the optional enterpriseFeatures object at the root of Onfido.init(), set useCustomizedApiRequests to true and define the callbacks for onSubmitDocument, onSubmitVideo, onSubmitSelfie.
1Onfido.init({2 ...3 enterpriseFeatures: {4 useCustomizedApiRequests: true,5 onSubmitDocument: (documentData) => {6 // Your callback code here7 },8 onSubmitSelfie: (selfieData) => {9 // Your callback code here10 },11 onSubmitVideo: (videoData) => {12 // Your callback code here13 },14 },15})
The callbacks return a FormData object, including the information that the SDK would send to Onfido. The callbacks are invoked when the end user confirms their image through the user interface.
Note that the data can also be returned in json format by adding the property formatter: 'raw' under the enterpriseFeatures object.
onSubmitDocument data parameter
1{2 file: blob,3 side: string,4 type: string,5 sdk_validations: object,6 sdk_source: string,7 sdk_version: string,8 sdk_metadata: object,9}
onSubmitSelfie data parameter
1{2 file: blob,3 snapshot: blob,4 sdk_source: string,5 sdk_version: string,6 sdk_metadata: object,7}
onSubmitVideo data parameter
1{2 file: blob,3 challenge: { type: 'recite' / 'movement', query: number[] / string }4 challenge_id: string,5 challenge_switch_at: number, // seconds6 languages: { source: 'sdk', language_code: string }7 sdk_source: string,8 sdk_version: string,9 sdk_metadata: object,10}
Uploading the media files to Onfido
By default, this feature will prevent the request from being sent to Onfido, requiring you to manually upload the media files to Onfido from your backend for further processing.
We strongly recommend that you add all of the data provided to you through the callbacks in your request to the appropriate endpoint - /documents or /live_photos. Additionally, you should use the SDK token created for each applicant in the Authorization header of the request as shown below.
Note that the SDK token is not included in the FormData provided by the callbacks. You may want to append this, or a different unique identifier that is mapped to the applicant's SDK token, on your backend before sending it off.
1Authorization: Bearer <SDK token here>
If you wish for the SDK to also upload the user-submitted data directly to Onfido you can resolve the promise with an object containing continueWithOnfidoSubmission: true.
1onSubmitDocument: (data) => {2 // Your callback code here3 ...4 // Once your code has executed, resolve the promise5 return Promise.resolve({ continueWithOnfidoSubmission: true })6 }
Managing the Onfido response
Once you have sent the request to Onfido yourself, you can supply the SDK with the response so it can determine what the end user should be presented with.
In the case where a success response is received, the promise should be resolved with onfidoSuccessResponse: <onfidoResponse>. Otherwise reject the promise with the Onfido error response.
Note: An error response could be returned due to image quality issues. In this case, the SDK will present the end user with the appropriate error message.
1onSubmitDocument: (data) => {2 // Send request to Onfido API /documents via your backend proxy3 .then(onfidoSuccessResponse =>4 Promise.resolve({ onfidoSuccessResponse: <onfidoResponse> }))5 .catch(onfidoError => Promise.reject(onfidoError))6 }
This is a sample openAPI YAML file you could use as an example to start your own proxy.
1openapi: 3.0.02info:3 title: Network decouple back-end sample4 description: Network decouple back-end setup skeleton5 version: '1.0'6 contact: {}7tags: []8servers: []9components:10 schemas:11 IDocumentsRequest:12 type: object13 properties:14 file:15 type: string16 format: binary17 description: Uploaded document. Passed in from the web SDK callback.18 type:19 type: string20 default: passport21 description: >-22 The type of document that was submitted. Passed in from the web SDK23 callback.24 side:25 type: string26 default: front27 description: >-28 The type side of the document that was submitted. Passed in from the29 web SDK callback.30 sdk_metadata:31 type: object32 description: >-33 The metadata that web SDK collects. Forward this to Onfido API34 without modifications. Passed in from the web SDK callback.35 sdk_validations:36 type: object37 description: >-38 This is a an object used by web SDK to seek image quality feedback39 from the API. Forward this object without modifications to Onfido40 API. Passed in from the web SDK callback.41 sdk_source:42 type: string43 default: onfido_web_sdk44 description: >-45 The source of origin of the requests. Forward this without46 modifications to the Onfido API. Passed in from the web SDK callback.47 sdk_version:48 type: string49 description: >-50 The SDK version. Forward this without modifications to the Onfido51 API. Passed in from the web SDK callback.52 IMultiFrameSelfieRequest:53 type: object54 properties:55 file:56 type: string57 format: binary58 description: Uploaded photo59 sdk_metadata:60 type: object61 description: >-62 The metadata that web SDK collects. Forward this to Onfido API63 without modifications. Passed in from the web SDK callback.64 sdk_source:65 type: string66 default: onfido_web_sdk67 description: >-68 The source of origin of the requests. Forward this without69 modifications to the Onfido API. Passed in from the web SDK callback.70 sdk_version:71 type: string72 description: >-73 The SDK version. Forward this without modifications to the Onfido74 API. Passed in from the web SDK callback.75 snapshot:76 type: string77 format: binary78 description: Uploaded snapshot taken by the Web SDK to improve fraud analysis.79paths:80 /onfido/v3.3/documents:81 post:82 operationId: OnfidoController documents83 parameters:84 - name: Authorization85 in: header86 description: Customer back-end Authentication token87 schema:88 type: string89 requestBody:90 required: true91 description: The API endpoint to intercept the document upload from the Web SDK92 content:93 multipart/form-data:94 schema:95 $ref: '#/components/schemas/IDocumentsRequest'96 responses:97 '200':98 description: >-99 The response received from Onfido v3.3/documents API call. The100 response format might slightly vary with the use case. Forward it101 without modifications as the callback response.102 content:103 application/json:104 schema:105 properties:106 id:107 type: string108 format: uuid109 created_at:110 type: string111 format: date-time112 file_name:113 type: string114 file_size:115 type: integer116 file_type:117 type: string118 type:119 type: string120 side:121 type: string122 issuing_country:123 type: string124 applicant_id:125 type: string126 href:127 type: string128 download_href:129 type: string130 sdk_warnings:131 type: object132 '201':133 description: ''134 content:135 application/json:136 schema:137 type: object138 '422':139 description: ''140 content:141 application/json:142 schema:143 properties:144 error:145 type: object146 properties:147 type:148 type: string149 message:150 type: string151 fields:152 type: object153 /onfido/v3.6/live_photos:154 post:155 operationId: OnfidoController156 parameters:157 - name: Authorization158 in: header159 description: Customer back-end Authentication token160 schema:161 type: string162 requestBody:163 required: true164 description: The API endpoint to intercept the live photos upload from the Web SDK165 content:166 multipart/form-data:167 schema:168 $ref: '#/components/schemas/IMultiFrameSelfieRequest'169 responses:170 '200':171 description: >-172 The response received from Onfido v3.6/live_photos API call. The173 response format might slightly vary with the use case. Forward it174 without modifications as the callback response.175 content:176 application/json:177 schema:178 properties:179 id:180 type: string181 format: uuid182 created_at:183 type: string184 format: date-time185 file_name:186 type: string187 file_type:188 type: string189 file_size:190 type: integer191 href:192 type: string193 sdk_source:194 type: string195 sdk_version:196 type: string197 download_href:198 type: string199 '201':200 description: ''201 content:202 application/json:203 schema:204 type: object
Custom media callbacks in cross-device flows
In the context of cross-device flows, you may choose to enable the media callbacks in either the desktop session or the mobile session.
A prerequisite is that you host the cross-device experience of the Onfido SDK yourself, as described in the self-hosted cross-device URL section of this document.
Enable custom media callbacks in mobile session
Once you have a server with the Onfido Web SDK installed and set up, you must initialize the mobile session with the callbacks and useCustomizedApiRequests options shown above.
1Onfido.init({2 ...3 enterpriseFeatures: {4 useCustomizedApiRequests: true,5 onSubmitDocument: (documentData) => {6 // Your callback code here7 },8 onSubmitSelfie: (selfieData) => {9 // Your callback code here10 },11 onSubmitVideo: (videoData) => {12 // Your callback code here13 },14 },15})
Enable custom media callbacks in desktop session
Media callbacks can also be triggered in the desktop session instead of the mobile session. To do so, please contact your Onfido Solution Engineer or Customer Success Manager as additional configuration is required.
Custom biometric token storage
When using Studio authentication tasks with on-device storage, the SDK stores encrypted biometric tokens in the browser local storage. The SDK also allows clients to take control of the token lifecycle and exposes a callback to override the default implementation to read and write the token, so it can be stored on device, in cloud, in a keystore or on your infrastructure.
Note: Defining the callback will prevent the SDK from storing the encrypted biometric token.
Note: To store the encrypted biometric token in your infrastructure, it is recommended to rely on webhooks instead.
1Onfido.init({2 ...3 onBiometricTokenGenerated: (customerUserHash: string, biometricToken: string): void => {4 // Called when a new biometric token is generated during enrollment.5 // Please ensure that customerUserHash to biometricToken relationship is 1:16 await fetch("https://example.org/store", { method: "POST", body: { customerUserHash, biometricToken } })7 },8 onBiometricTokenRequested: async (customerUserHash: string): Promise<string> => {9 // Called when biometric token is requested during authentication10 const response = await fetch("https://example.org/retrieve?key=" + customerUserHash)11 return await token.text()12 }13});
User analytics callbacks
The SDK allows you to track a user's journey through the verification process via a dispatched event. This gives insight into how your users make use of the SDK screens.
In order to track a user's progress through the SDK an EventListener must be added that listens for userAnalyticsEvent events. This can be done anywhere within your application.
The code inside of the EventListener callback will be invoked when an event is triggered.
1addEventListener('userAnalyticsEvent', (event) => /*Your code here*/);
The event parameter being passed in the callback contains the following information:
eventName {String}: Name of the event triggered (full list below)properties {Object}: Event-specific propertiesisCrossDevice {Boolean}: Set totruewhen the event originates from a mobile session
| eventName |
|---|
| WELCOME |
| USER_CONSENT |
| DOCUMENT_TYPE_SELECT |
| ID_DOCUMENT_COUNTRY_SELECT |
| CROSS_DEVICE_INTRO |
| CROSS_DEVICE_GET_LINK |
| CROSS_DEVICE_START |
| DOCUMENT_CAPTURE_FRONT |
| DOCUMENT_CAPTURE_BACK |
| DOCUMENT_CAPTURE_CONFIRMATION_FRONT |
| DOCUMENT_CAPTURE_CONFIRMATION_BACK |
| FACIAL_INTRO |
| FACIAL_CAPTURE |
| FACIAL_CAPTURE_CONFIRMATION |
| VIDEO_FACIAL_INTRO |
| VIDEO_FACIAL_CAPTURE_STEP_1 |
| VIDEO_FACIAL_CAPTURE_STEP_2 |
| MOTION_FACIAL_INTRO |
| MOTION_FACIAL_ALIGNMENT |
| MOTION_FACIAL_CAPTURE |
| MOTION_FACIAL_NO_FACE_DETECTED |
| MOTION_FACIAL_CAPTURE_ERROR_TIMEOUT |
| MOTION_FACIAL_CAPTURE_ERROR_TOO_FAST |
| MOTION_FACIAL_UPLOAD |
| MOTION_FACIAL_UPLOAD_COMPLETED |
| MOTION_FACIAL_CONNECTION_ERROR |
| UPLOAD |
Version
You can access the sdk version through the handle once the SDK is loaded.
1const onfidoOut = Onfido.init({...})23onfidoOut.addEventListener('userAnalyticsEvent', (event) => {4 console.log('Version', onfidoOut.version)5});
onExternalLink callback
When end users open a link to an external website or resource (such as a PDF file) during a verification flow in the Web SDK, the default behaviour is to open the link in a new browser tab.
To enable customers to tailor this behaviour to their specific needs when implementing the Web SDK in a webview or other custom integrations, the onExternalLink callback is provided to handle the opening of external links or the download of documents.
This feature is particularly useful for flows that integrate the Qualified Electronic Signature (QES) module, where buttons may redirect end users to external websites or allow PDF files to be viewed or downloaded.
The behaviour of the onExternalLink callback varies depending on the type of Web SDK integration:
- In a desktop integration, the
onExternalLinkcallback is triggered when available (i.e., when a link is clicked) - In a cross-device integration hosted by Onfido, the
onExternalLinkcallback is not triggered on desktop as cross-device workflows always run in a browser environment where this functionality is inherently handled - In a cross-device integration hosted by the customer (self-hosted), the
onExternalLinkcallback is triggered when available (i.e., when a link is clicked)
Below you will find an example implementation of the onExternalLink callback.
1Onfido.init({2 token: "<YOUR_SDK_TOKEN>",3 ...4 // The url is a string representing the external link5 onExternalLink: function (url) {6 console.log("Open the URL: ", url);7 },8});
Self-hosted cross-device URL
The following feature must be enabled for your account before it can be used. For more information, please contact your Onfido Solution Engineer or Customer Success Manager.
This feature allows you to specify your own custom or whitelabel url that the cross-device flow will redirect to instead of the Onfido default id.onfido.com. To use this feature, generate an SDK token as shown below and use it to start the SDK.
1$ curl https://api.onfido.com/v3/sdk_token \2 -H 'Authorization: Token token=YOUR_API_TOKEN' \3 -F 'applicant_id=YOUR_APPLICANT_ID' \4 -F 'referrer=REFERRER_PATTERN' \5 -F 'cross_device_url=YOUR_CUSTOM_URL'
In addition to this, you must either:
-
Set up a server to forward the incoming HTTP request, including the path, to https://id.onfido.com
-
Set up a server to host the Onfido Web SDK yourself at the provided URL
Set up a server to forward the incoming HTTP request, including the path, to https://id.onfido.com
You can do this by setting up a server as a reverse proxy so that the URL that the end-user sees is your selected URL but the content shown is the Onfido-hosted Web SDK. An example set-up for a minimal nginx server using docker:
nginx.conf
1server {2 # Change the next 2 lines as needed3 listen 80;4 server_name localhost;56 location / {7 # This forwards the path to Onfido and is the only change8 # necessary when working with the default nginx configuration9 proxy_pass https://id.onfido.com;10 }11}
dockerfile
1FROM nginx:1.15.8-alpine23COPY ./nginx.conf /etc/nginx/conf.d/default.conf
Set up a server to host the Onfido Web SDK yourself at the provided URL
This server must use the same version of the Onfido Web SDK and must initialize the SDK with Onfido.init({ roomId: "<INSERT ROOM ID HERE>" }). All other configuration options, except for callbacks provided for the useCustomizedApiRequests feature, will be provided by your original instance of the Onfido Web SDK.
Below is an example of how you could host the Onfido Web SDK with minimal setup. This index.html file starts the Onfido Web SDK using only the js and css files from the Onfido CDN (https://sdk.onfido.com/<version>).
index.html
1<!DOCTYPE html>2<html lang="en">3 <head>4 <meta5 charset="utf-8"6 name="viewport"7 content="width=device-width, initial-scale=1"8 />9 <meta name="mobile-web-app-capable" content="yes" />10 <meta name="apple-mobile-web-app-capable" content="yes" />11 <meta name="format-detection" content="telephone=no" />12 <title>Onfido Verification</title>13 <style type="text/css">14 html,15 body {16 height: 100%;17 margin: 0;18 }19 body,20 button {21 -webkit-font-smoothing: antialiased;22 }23 @media (min-width: 30em) {24 #onfido-mount {25 position: relative;26 top: 10%;27 }28 .onfido-sdk-ui-Modal-inner {29 font-family: 'Open Sans', sans-serif !important;30 }31 }32 </style>33 <!-- Important: You must use the same version as you are using on the desktop -->34 <script src="https://sdk.onfido.com/v14" charset="utf-8"></script>35 </head>3637 <body>38 <div id="onfido-mount"></div>39 <script type="text/javascript">40 /*41 Get the roomId from the url (last 6 characters)42 Example:43 - https://example.com/XXCOXCKL -> roomId (COXCKL)44 */45 var roomId = window.location.pathname.substring(3, 9)4647 Onfido.init({48 containerId: 'onfido-mount',49 roomId,50 })51 </script>52 </body>53</html>
More information
Supported browsers
 |  |  |  |
|---|---|---|---|
| Latest ✔ | Latest ✔ | Latest ✔ | Latest ✔ |
Node.js supported versions
The SDK is compatible with the all supported Node.js versions (currently starting with Node.js 16).
Accessibility
The Onfido SDK has been optimized to provide the following accessibility support by default:
- Screen reader support: accessible labels for textual and non-textual elements available to aid screen reader navigation, including dynamic alerts
- Keyboard navigation: all interactive elements are reachable using a keyboard
- Sufficient color contrast: default colors have been tested to meet the recommended level of contrast
- Sufficient touch target size: all interactive elements have been designed to meet the recommended touch target size
Refer to our accessibility statement for more details.
⚠️ Note: If you make your own UI customizations, you are responsible for ensuring that the UI changes will still adhere to accessibility standards. For example, accessible color contrast ratios and dyslexic friendly fonts.
Troubleshooting
General Content Security Policy (CSP)
For guide on CSP common issue and recommendations, please refer to the guide Onfido Web SDKn and Content Security Policy (CSP) guide.
Iframe integration
For instruction and guide on how to embed the Onfido Web SDK in an iFrame, please refer to the guide Using the Onfido web SDK in an iFrame.
Upload fallback
Onfido Web SDK versions <13.0.0 had a parameter named uploadFallback that could be set on both the document step and the face step. This parameter allowed clients to present end-users with a file input capability during the SDK flow.
With Web SDK 14.15 and above, the uploadFallback client-side parameter has been reintroduced.
To enhance the overall flow security, it is disabled by default and requires activation through the Onfido Support Team.
Permissions issues when using the Web SDK in a webview
For recommendations and code samples on how to embed the Onfido Web SDK in a webview, please refer to the guide Using the Onfido web SDK in a webview.
Support
Should you encounter any technical issues during integration, please contact Onfido's Customer Support team via email, including the word ISSUE: at the start of the subject line.
Alternatively, you can search the support documentation available via the customer experience portal, public.support.onfido.com.
We recommend you update your SDK to the latest version release as frequently as possible. Customers on newer versions of the Onfido SDK consistently see better performance across user onboarding and fraud mitigation, so we strongly advise keeping your SDK integration up-to-date.
You can review our full SDK versioning policy here.
License Information
Please see LICENSE for licensing details.